

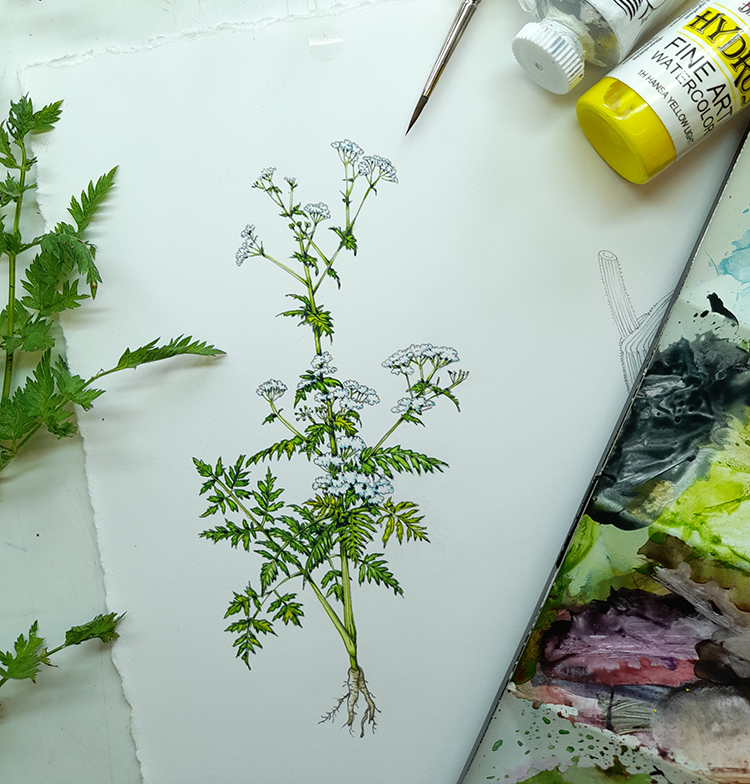
Habit sketch of Cow parsley: step by step
Habit sketches are an important aspect of doing botanical illustrations. They need to show an entire plant, and suggest how it grows within its environment.
This one of the Cow parsley, Anthriscus sylvatica, was recently done for FOR in Sweden. It accompanied a large sheet of sketches of the same plant. To learn more about Cow parsley, and how to identify it, check out my blog.
There’s also a Youtube film that accompanies this blog; please find a link at the end of this blog, or click here to access it.
You’ll notice that this habit sketch is less accurate than many of my illustrations. This goes with the territory. There’s only so much detail you can cram into a 20cm tall illustration of an entire plant, and individual petals and leaf veins don’t get a look in. However, if you want to show a whole plant, rather than one portion of it, then a habit sketch is the best way to do this. Alternatively, you can use a much larger format and work on a plant portrait which will be more accurate and less impressionistic.
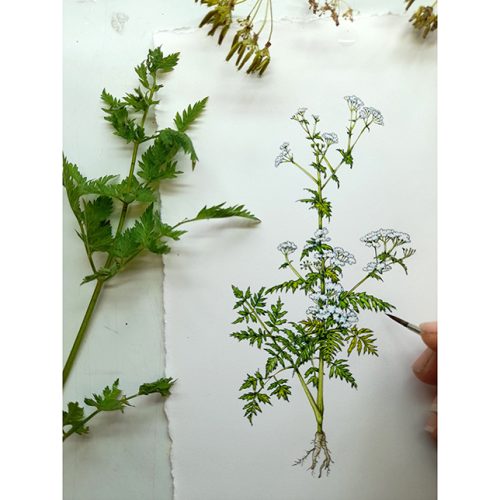
![]()
Completed habit sketch of the Cow parsley
Habit sketch: Pencil rough
The first thing to do when confronted with a habit sketch is to learn as much as you can about the plant. I gather lots of specimens, and consult various botany books. these include A Flora of the British Isles by Clapham Tutin and Moore, The Wildflowers of the British Isles by Garrard and Streeter, the pen and ink drawings of Stella Ross-Craig, Collins Flower guide by David Streeter, and (in this case) the BSBI Handbook: Umbellifers of the British Isles.
Once the plant and botanical information is collated, I draw up a pencil rough that shows each important element to its best advantage. I use mechanical Pentel P205 pencils with an H or HB 0.5mm lead. I draw directly onto my watercolour paper, in this case hotpress Fluid 100 by Global Arts.
One of the reasons why I use Fluid 100 is because it’s quite good at allowing you to erase your pencil lines after you’ve painted on top of them. Various papers will, or won’t be good for this. The way I paint means that it’s important that a paper will give up the graphite but not the paint pigments once I’ve completed an illustration.
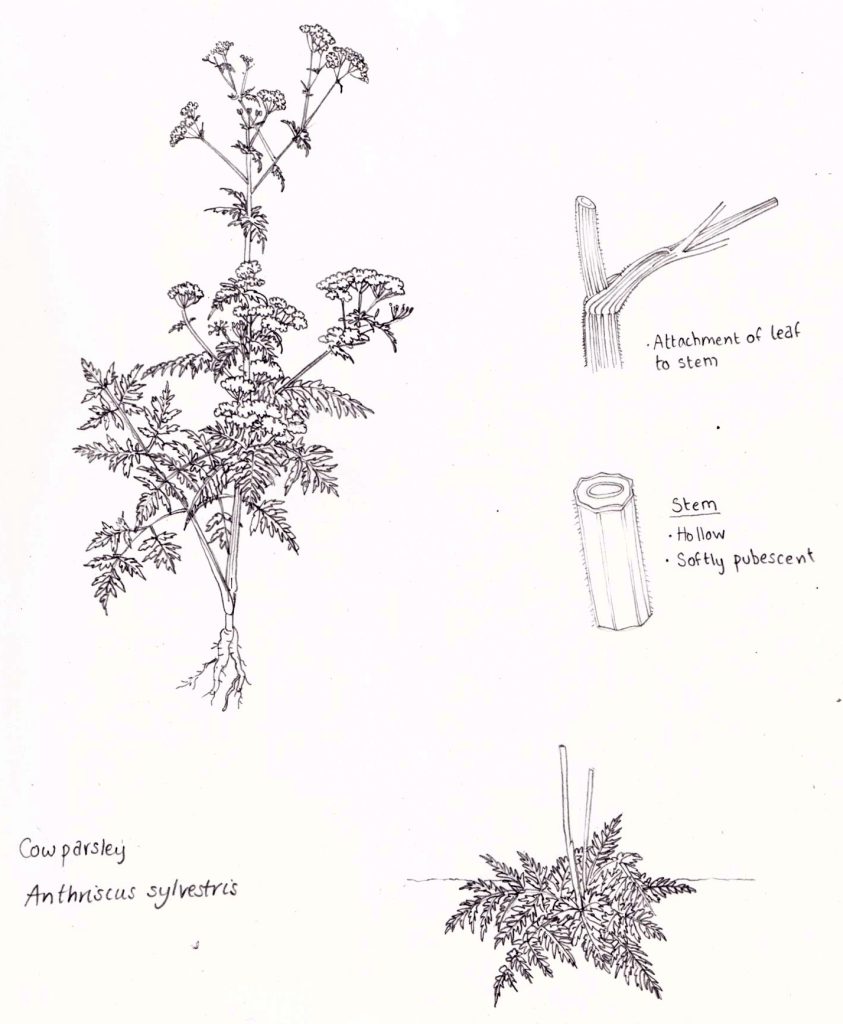
Cow parsley pencil rough (with basal rosette and stem details)
Are leaves alternate or opposite? Are upper leaves noticeably different from lower ones? is there a basal rosette of leaves? How are the flowers carried on the stems? What does the root do? All this information needs to be given by the illustration.
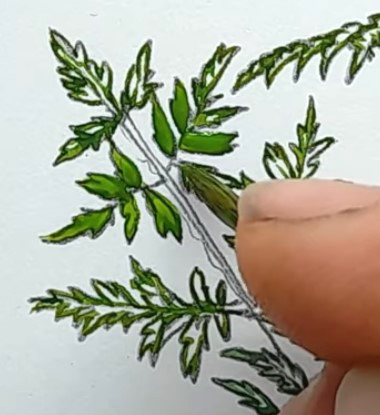
Habit sketch: Leaves
Once the client has approved the roughs, you can start adding colour. I begin with the leaves, outlining them in green. Winsor and Newton are my favourite watercolours, and I use pans topped up with tube colours. I mix sap green, some cobalt blue, and a bit of cadmium yellow light together. I keep the paint quite thick and dry at this point. Carefully, using my trusty Series 7 sable brush (size 1), I follow the pencil lines of the leaf edges. This approach is the same as I use when painting ferns and bracken.
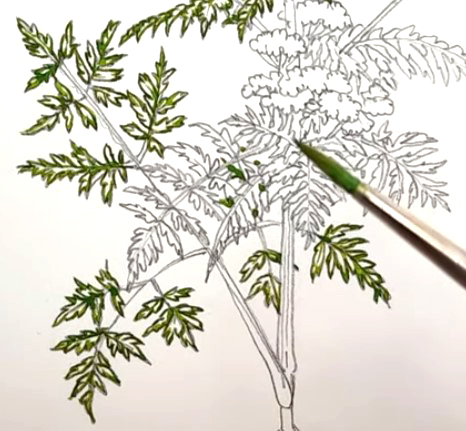
Outlining the leaves
I observe my plant carefully, and add some variation to the green hue. The central leaf is a little paler and brighter green than the others – I add yellow to the mix and outline it with this new colour.
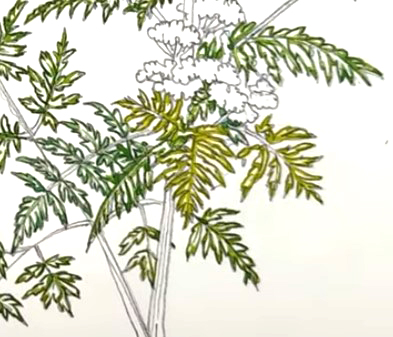
Different greens are used to outline the leaves
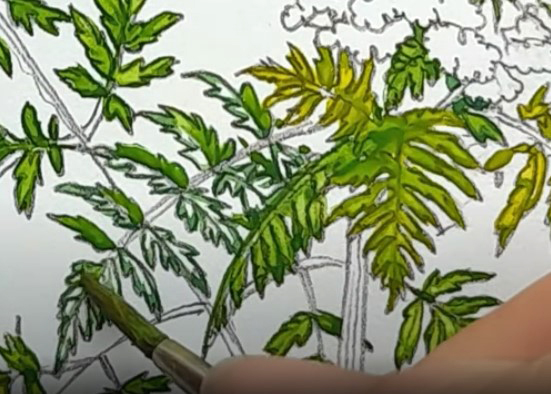
Habit sketch: Top washes on leaves
Once these initial lines are dry, I add water to the greens to make them lighter and more dilute. Then, using the same brush, I pop blobs of this watery green onto the leaves. I love the crisp edges watercolour gives if you allow very wet paint to dry, and this is the effect I’m after here.
Watery green top wash is applied very wet
Because of the midrib veins and the way the leaves are structured, you’ll often see one side of a leaflet is darker than the other. This needs to be included in the habit sketch. You can either do this by going over the darker, shaded side with two layers of top-wash; or you can use a different and brighter colour for the top-wash on the lighter side of the leaflet.
Putting the first wash onto only one side of each leaflet
In this case I’ve done both. I added some yellow to the top-wash, and covered the entire leaflet with this mix. (I’d made sure the first and darker wash was completely dry first.) Allow the paint to dry completely.
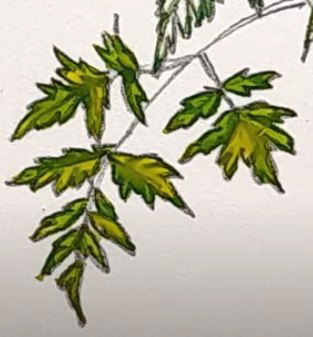
Two different colours of top-wash used on the leaflets
Habit sketch: Painting the stems
I actively enjoy painting stems because it’s so easy. Mix up the right colour (as always, check with the plants in front of you. It’s so important to keep referring to the plants you’re illustrating if you want to get details such as form and colour right). This is a sap green plus a little yellow ochre, perhaps a touch of blue, and plenty of a clear bright yellow such as Cadmium light.
Then just outline the stems, following the pencil lines. You can apply a little more pressure to one side of the stem than to the other. This helps suggest a light source, and shadow. Traditionally in botanical illustration, the light source comes from the top left, so the heavier lines are to the right of each stem.
You can also add ridges, furrows, or textures with simple lines if that’s appropriate for the species you’re working with. With Cow parsley, the stems are ridged, prominently so towards the base of the plant.
Outlining the stems
Once the illustration is completely dry, dilute the colour you used for the stems with plenty of water. Then simply put this watery wash over your stems and allow it to dry.

Putting a watery top-wash onto the main stem
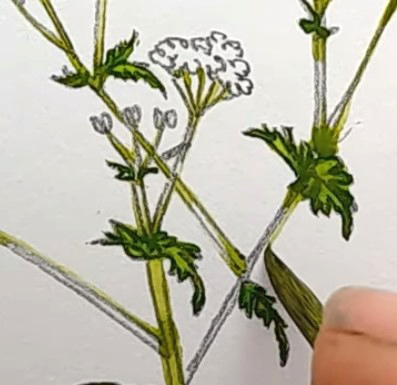
Habit sketch: Painting the flowers
With habit sketches, the precision and detail of each flower is compromised in an effort to represent the entire plant. So there are no individual petals to portray, just the frothy mass of flowers that constitute each umbel (or flowering head).
Illustrating white flowers is really hard – you need to show their form without making them look like they’re another colour. For more on this subject, check out my blog or my Youtube film. In this case, the shadows cast by each umbel are going to be key, and will be what we use to represent some tonal depth. As with the leaves and stems, out light source is from the top left; so the shadows will fall from the right hand side of each umbel.
To ensure the flowers look clean and white, I mix a light blue. Cerulean blue is light and bright enough. Dilute it to a very pale tone, then pick out the shadows with the tip of your brush.

Adding shadow to the flowers
I work from the top of the plant downwards. this helps me avoid resting my hand in wet paint and smearing the illustration. Series 7 brushes are expensive, but they justify their cost by holding their tips. When you’re applying tiny amounts of pale paint to the nooks and crannies of an illustration, the accuracy you can get from your tools is really important. For more on my choice of paintbrushes, click here.
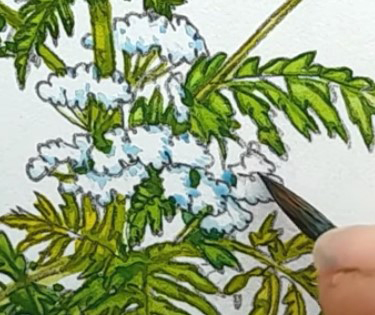
Applying blue to show shadow in the central flowers
Habit sketch: The root
The root tends to be included in a habit sketch, specially if it’s an important diagnostic feature of the species. Please note that it’s illegal to uproot flowers in the wild – I happen to have cow parsley growing in my Aunt’s garden, and she was happy for me to unearth a few plants to get at the roots.
Illustrating these tap roots couldn’t be easier. In exactly the same way as you tackled the stems, outline the root. I mixed some Vandyke brown with yellow ochre. Remember to pick out the texture and root hairs, too. Once dry, dilute the mixed colour and pop the watery top wash over the whole root. Done.
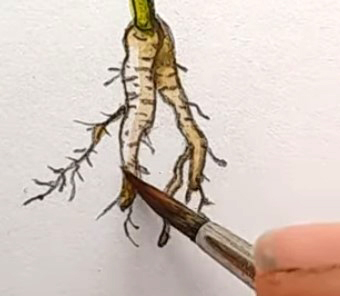
Putting a top-wash on the Cow parsley taproot
Habit sketch: Adding shadows
Now the illustration is more or less complete, it needs shadows to bring it to life. I favour a mix of purple and cobalt blue, sometimes with a dash of Vandyke brown. Using this, and being really careful not to go too dark too fast, I pick out the darkest shadows.
This is an important stage. Judicious application of shadows can help clarify muddy or messy areas of a sketch.
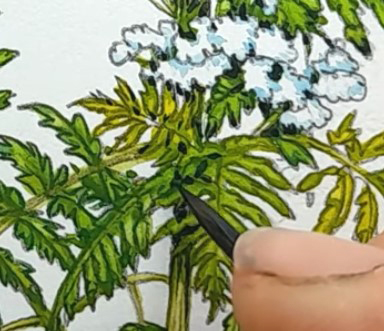
Adding shadows to clarify a leaf’s structure
I always put shadows below each flowering head, and frequently pick out the tips of leaves to help the eye find the edges of the illustration.
Again, because the scale of the illustration shows an entire plant, you’ll find it hard to accurately represent the shadow details on each portion of each leaf. This is one of the drawbacks of a habit sketch. I often find myself trying to pull in more detail than is possible. there has to be an element of “giving the impression” of a plant when it comes to habit sketches. I’ll admit to struggling with this looseness at times.
Fixing mistakes
Inevitably, sometimes when we paint we make mistakes. Quite often I’ll think that a stem I painted is too wide, or perhaps a top-wash has overflowed an edge. There’s no need to despair.

Using white gouache to fix mistakes
I use Winsor and Newton white gouache, permanent white, to fix my mistakes. I use it really thick, straight from the tube or mixed with a tiny amount of water. It helps sharpen up messy edges, or will hide a mistake. It should be noted that using this is fine for your own work and for work that’s going to be reproduced (it doesn’t show up on scans); however, if you plan on selling your original artwork then the use of white gouache is frowned on.
Conclusion
And that’s it! The illustration is finished.
Last step is to erase the underlying pencil lines. If you’ve got a good hot press paper, you should be able to do this without damaging any of the paint (no, I don’t understand why this works either). I’d suggest going easy on the rubbing out around the flowers as the only marks suggesting them are the pale blue shadows and the pencil. A tougher approach can be used on the stems and leaves and root.
Hopefully, this illustration immediately suggests an entire Cow parsley plant growing in the wild. Habit sketches tend to accompany much more detailed botanical illustrations which help clarify exact structures of stem, root, leaf, fruits, and flowers. I find them pretty hard to illustrate, but exceptionally useful when it comes to identifying wild flowers in the field.
And now, I hope, you’ll have some idea of how to go about creating your own illustration of an entire plant; your very own habit sketch.
Completed habit sketch of Cow parsley with paint box
To see a real-time film of me completing this illustration and discussing the process, please check out the film below. Thanks.
Dear Lizzie A very good and informative video but I worry for your hands they look like a war zone. Please look after them or else they will become arthritic and having suffered with this I don’t want you to go through the same thing.
Apologies for this diversion from the subject of the video.
Regards Peter
Hi Peter
I know, it’s true – my hands are super beaten-up! More to do with cleaning/cooking/ walking in the frosty hills and all the other bits of life than illustrating. But I do worry a bit about them. And about my eyes. Thanks so much for your input and thoughtfulness. And Im so sorry about your arthritis, it’s a horrible affliction, and I believe it’s very painful. Although, as (I think?) an auto-immune condition, I dont know if there’s anything anyone can do to make it less likely that we’ll develop it? If there were to be, Id probably be up for it! Thanks again
Lizzie
Hi Lizzie,
This is another amazing painting and tutorial. Unfortunately to busy with the builders and dust accumulating, to try this out. I will in the new year try out some work on the beautiful paper.
Stay safe, and healthy.
Greetings,
Ineke
Hi Ineke, oh the joys of life getting in the way of making art! Good luck with it all, and yes, report back about the Fluid 100 once you have a moment to breathe.
X
Beautiful illustration demonstrated on your blog, I love visiting this blog on regular basis – Thanks
Thank you, lovely to have return visitors!
Thanks for your interesting description of your methods, and your lovely, crisp artwork. I did a course at Kew with Annie Farrer some years ago, and knew Christabel King. Their methods were strictly for scientific botanical illustration, and exquisite, but far too exacting for me. I painted large scenic backdrops for theatre as a career and after retiring took up archaeological illustration, equally specific in technique. So quite a change from 100 ft backcloths down to tiny artefacts/flowers. Thanks to your video I am enthused to try botanical illustration again. Your technique of lining in and then filling in with mid-tones then dark reminds me of my scenic art technique, it has encouraged me to do botanical art again. So I have been dragging my husband on early morning walks, collecting far too many samples and photos to ever get them done before they decline. Thanks again, (and I envy your ‘shed’/studio)!
Hi Eleanor
Thats really interesting. I know, I was talking to my other half last night abotu how what they do at Kew is probably something I could never manage (I was thinking of Lucy Smith who spends all her time doing exquisite ink drawings of newly described palm species) and of Deborah Lambkin (I think) who is the orchid painter for the RHS orchid society. Absolutely perfect in all respects. But what if she fancied painting a sedge one day? Im jelous of you doing that course though, one day I hope to have time to take a Kew course. SO much to learn.
The cross over between archeological and botanical makes total sense to me, it’s the same skills I suppose. Minute examination and attempting to record it. I bet you’re excellent at the botanical stuff with that experience under your belt. And how lovely to have painted theatre backdrops, that’s what my Mum did in her 20s, at La Scala and various opera houses across Italy and Paris in the early 1960s. She loved it, and all the bustle and panic of hitting the deadline of a show opening.
Thanks so much for your message, really good to know you’re back into the botany. Bet you’d adore the totally minute stuff; grass flowering heads, mosses etc. And I love that your husband comes nature-walking with you! Mine rolls his eyes and does stuff with bicycles, but never objects when I appear with armloads of green stuff to draw, then disappear for days on end.
Thanks Eleanor
X
I discovered you for the first time today, 12-4-2025. I am working on learning botanical watercolor on my own and your work is absolutely fascinating. Not only is it beautiful and so skillful but you are incredibly fun to listen to as you work. What a joy it is that I have found you. I look forward to getting to know you better here through your posts and work.
Thank you,
Bonnie
Hi Bonnie, Im so glad this is helpful for you, and well done learning botanical watercolour! Hope you love it as much as I do.