

Geranium Variegated Leaf Step by Step
Geranium Variegated leaf step by step
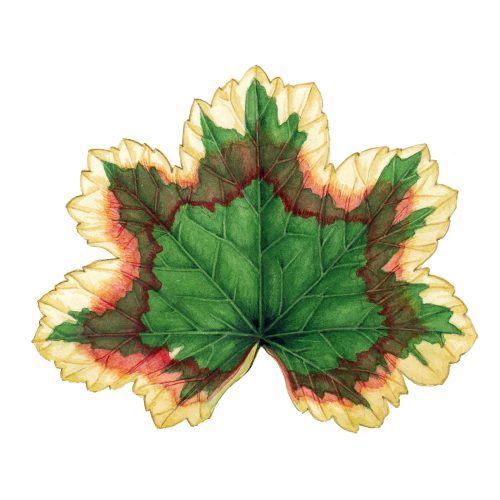
I love geraniums, and am especially fond of the variegated leaves some types have with their circles of cream, green, and red. I think a geranium like this one is my favourite house plants which shows leaf variegation.
Ninety percent of all wild geraniums come from South Africa, and they’re hardy plants (although frost can kill them). There are loads of different types available from garden centres, and those whose leaves are striped with white and red areas are called Zonal geraniums (or Pelargoniums). However, it’s tricky to tell geraniums and pelargoniums apart, as this blog from NZ Stuff explains.
This step by step blog follows on from my blogs on pattern.
Geranium and pelaronium sketchbook study
When I was researching why some plants have warning colouration, I found that flower petals of these Zonal geraniums paralyze the Japanese beetle Popillia japonica, a common garden pest in the US. They do this by by mimicking insect neurotransmitters. Thinking back to my blog on stripes, perhaps our striped leaf is a form of warning colouration?
On with the illustration. The plant used in this step by step is Geranium “Mrs. Pollock”.
Choosing and Drawing a leaf
When you choose your plant, make sure it’s one with plenty of leaves, and with distinct markings that you can illustrate. It might help to take the leaf off the plant so you can examine it better.
First step is to draw up the leaf in pencil. Begin by drawing a rough suggestion of the leaf shape, and use the leaf veins as guides.

Rough outline of Pelargonium leaf
Work into the line drawing, looking for the shapes of each leaf lobe, and for the wide teeth on the leaf edge. Plot in the lines where the red anthocyanin pigment first appears, and where the green pigment area ends. A quick sketch so you don’t lose track of what colours go where can be helpful, and can be rubbed out later.
Look closer at the veins and draw the side veins. You’ll be leaving these as white for a while, so feel free to give them a touch of thickness by using two pencil lines instead of one if it helps.
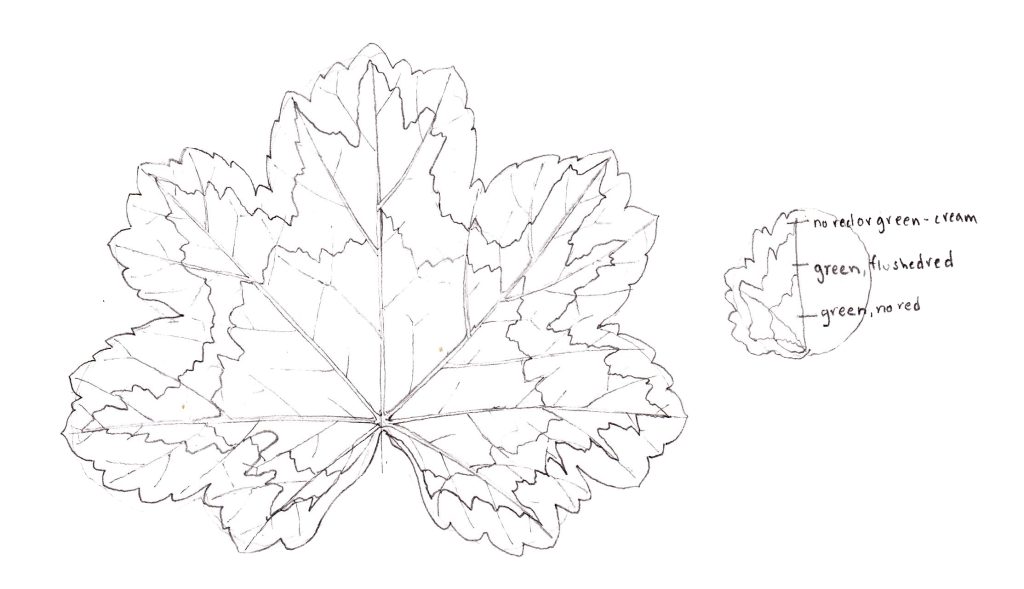
Detailed pencil drawing of Pelargonium leaf
Variegation: Adding greens
Now mix up a soft green. Daniel Smith Spring green, Cobalt blue, and a touch of Naples yellow works well. Using little brush marks and looking at the leaf, start painting in the darker areas of green. Look for patterns in the way the shadows fall. Having a good strong light helps with this, a daylight lamp behind the left shoulder works wonders. There are deeper greens down where the radial veins meet, and on the right hand of the central vein. It’s a bit darker on the underside of the branching veins. Let the paint dry.
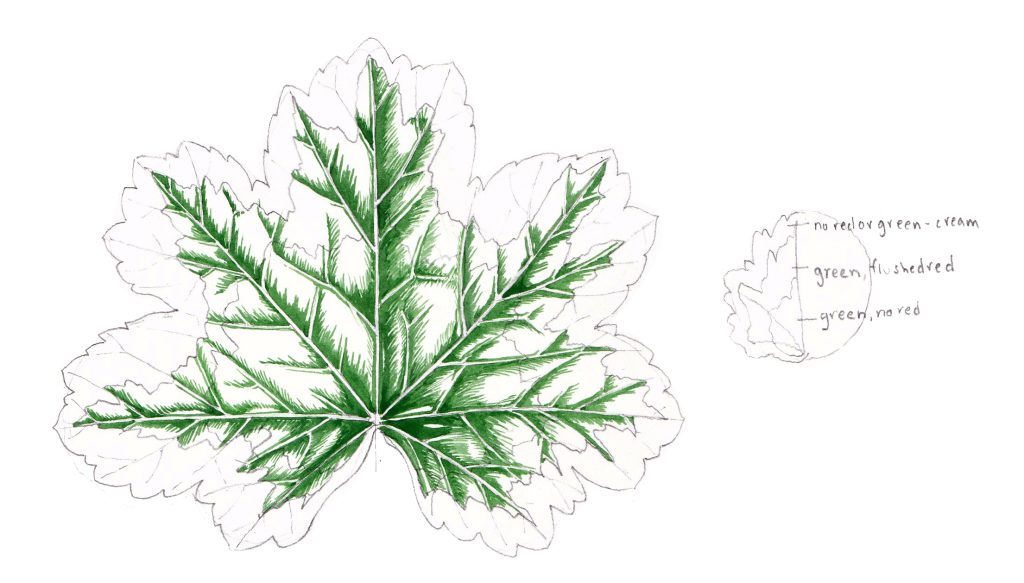
Deep greens are added to the leaf
Make a tint of your green by diluting it with clean water. Lay this on top of the painting, making sure to leave the veins as thin unpainted areas. Leave paler areas in the middle of each leaf section, but try to blend the green in with the little brush marks. Ideally, it’s an easy visual transition between the pale and darker green. Don’t worry about your pencil lines, you can rub them out later.
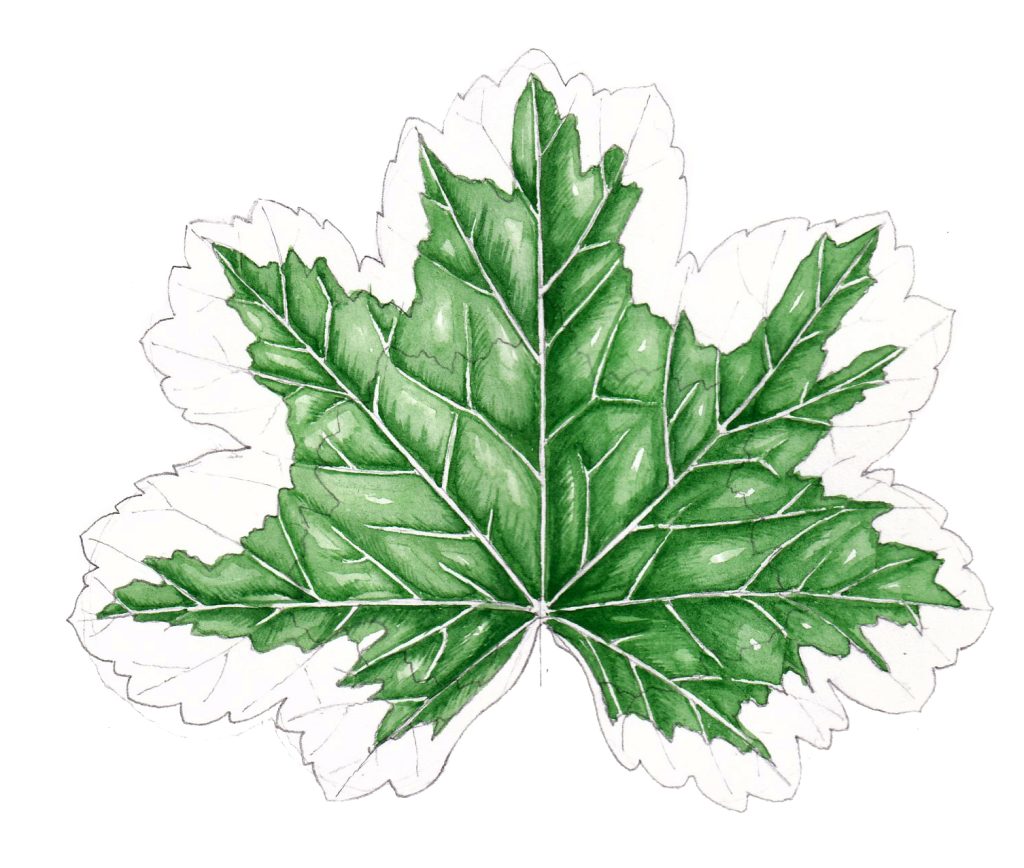
Main greens are completed
Variegation: Adding Cream
Mix a pale yellow. Naples yellow plus a dash of Pale cadmium yellow is the right sort of thing. Keeping it dilute, pick out the edges of the leaf and the same shadows cast by the veins as before. This area of leaf isn’t white, despite having no green cholorphyll. Background pigments like carotenoids and flavonoids give that creamy colour. Again, be sure to leave the white of the paper for your highlights.
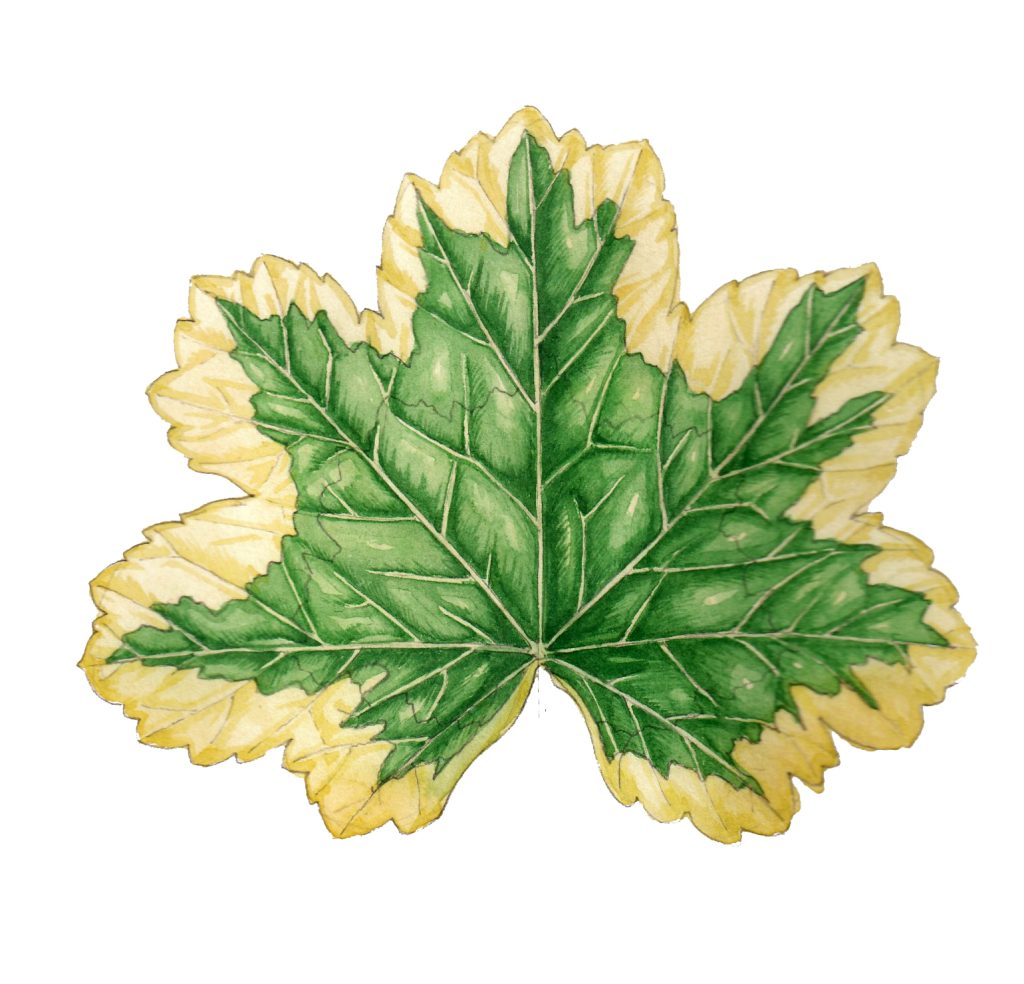
Cream margins are added
Blend these areas of cream into the rest of the leaf margin with a tint of your yellow mix. Once that’s dry, mix up more of your pale yellow and paint it over the entire leaf, including the veins. Let it dry. Using light pencil, you can draw in outside edges of the red, if you’ve not already done so. It’s easier to see what’s going on now there’s some colour down.
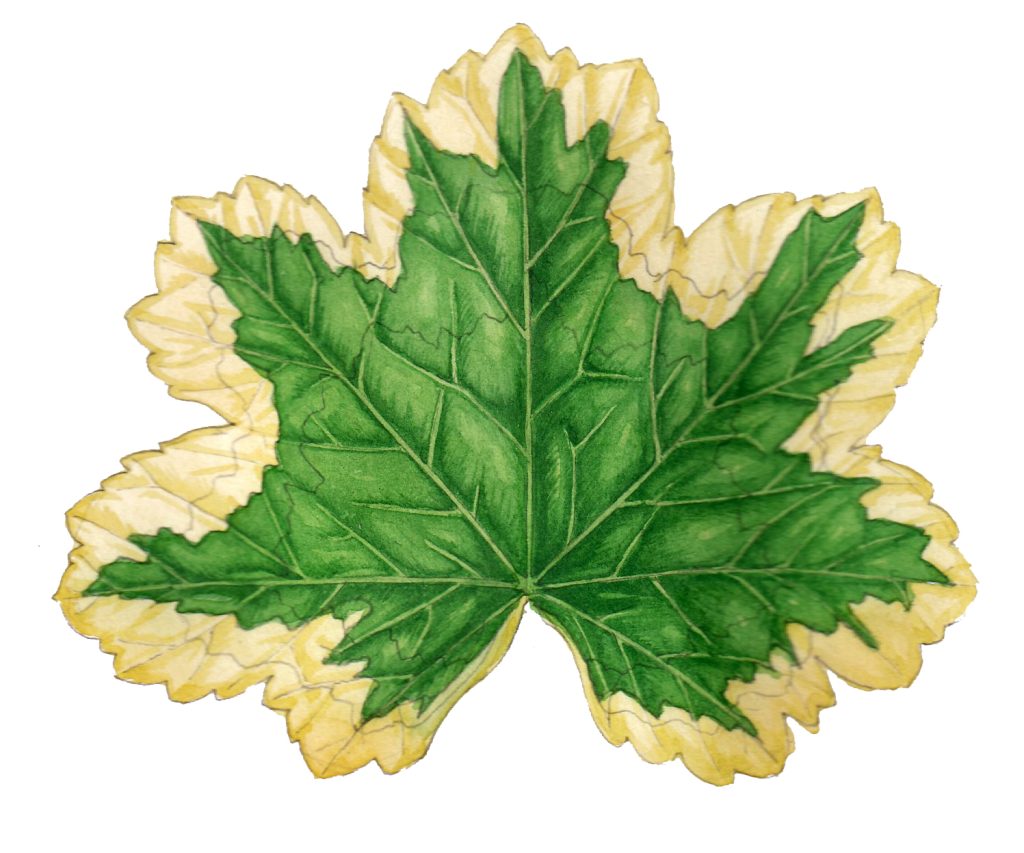
Geranium leaf plus pencil guide to red areas
Variegation: Adding reds
Time for the red anthocyanin pigments. This is a tricky colour to mix; it’s somehow crimson and bright orange-red at the same time.
We also have to be incredibly careful not to allow the addition of the red on top of the green to make a muddy mess, so go carefully. Try mixing Alizarin crimson, Opera rose, and Cadmium orange. Keep experimenting with your mix til it matches the reds on the leaf.
Starting on the inside edge of the red pigments, use tiny outward-pointing brush strokes. Before these fully dry, go over them with a slightly paler, wetter red. Be super careful not to let the red get muddy. Pull this scarlet out over the variegated pale margin, making sure it’s paler than the crimson you first applied. Let this dry and very carefully outline the vein edges in red. Your leaf may well look a bit rubbish at this stage, but don’t panic.
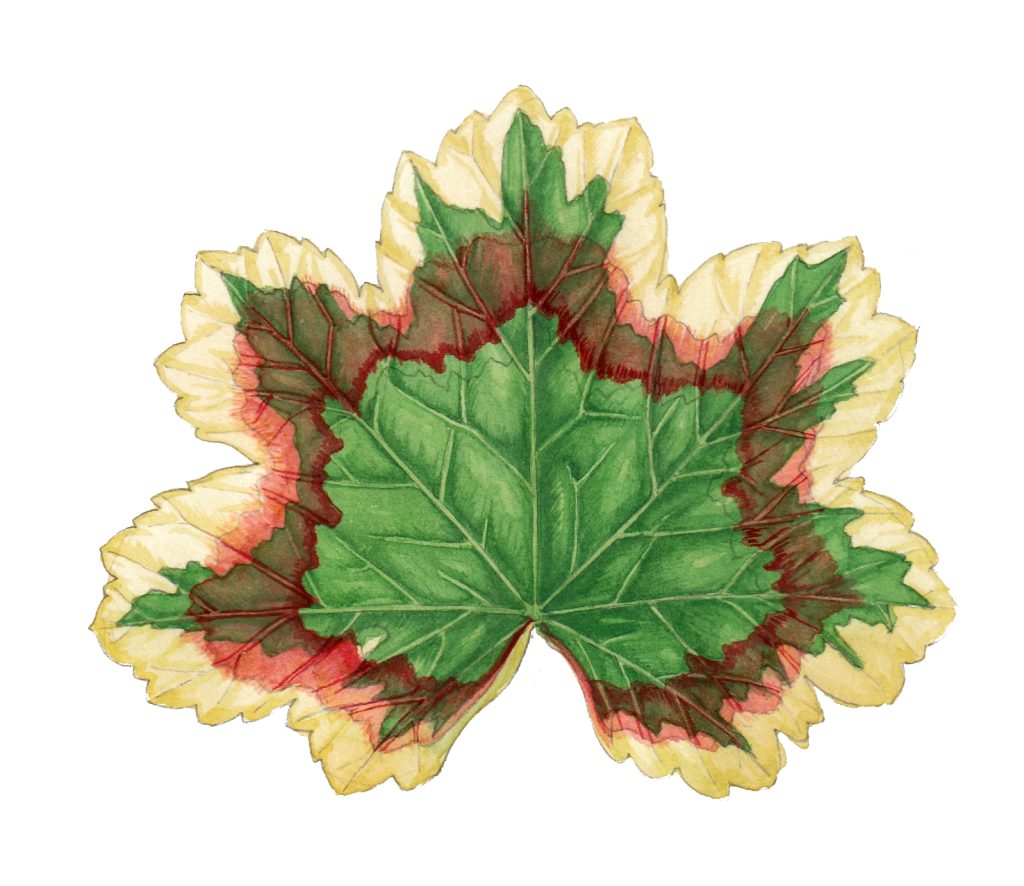
Geranium leaf plus reds
Variegation: Adding shadow
Mix up a darker green, perhaps by adding purple to your existing green mix. Pop a watery tint on this on top of the whole green area, including over the red areas. Be careful not to mix the red and the green. Let it dry fully.
Using a green darkened with blue or purple, pick out your darkest areas of green leaf. The base of the leaf and right hand side of the central vein are darker, and there are tiny darker areas by the other veins.
Look for darker regions at the creamy edge. With a delicate touch, pick these out with a mix of your pale yellow and a dash of green. Using this to clarify the leaf edges helps pull the illustration into focus.
Once it’s dry, use a soft eraser to rub out the pencil lines. Some watercolour papers handle this better than others, you can be quite vigorous with Fluid 100 HP and not harm the painting.

Geranium leaf with shadows added
Conclusion
Illustrating different colours on one leaf is not impossible, and feels far more frightening than it turns out to be. Variegated leaves are beautiful, and well worth further examination. Once you’ve given this leaf a whirl, a whole load of new subjects become available, and many are houseplants that can be painted year round. For more on leaf variegation, check out my blog.
Looking for sable vs. synthetic brushes and found your page.
Thank you for the art instruction. Not to mention the wonderful art.
Keith
My pleasure, Keith. Glad to be of help