

Garden Lupin Sketchbook study

The Garden Lupin, Lupinus polyphyllus, is one of the invasive plants I was recently asked to illustrate for FOR Sweden. This blog talks you through the steps involved in creating a finished botanical illustration of this flower. There seems to be an enormous amount of confusion over the English name of this plant: Blue bonnet lupin, Texas lupin, Large-leaved lupine, or garden lupin appear amongst many others. I’ll just refer to the plant as “lupin”.
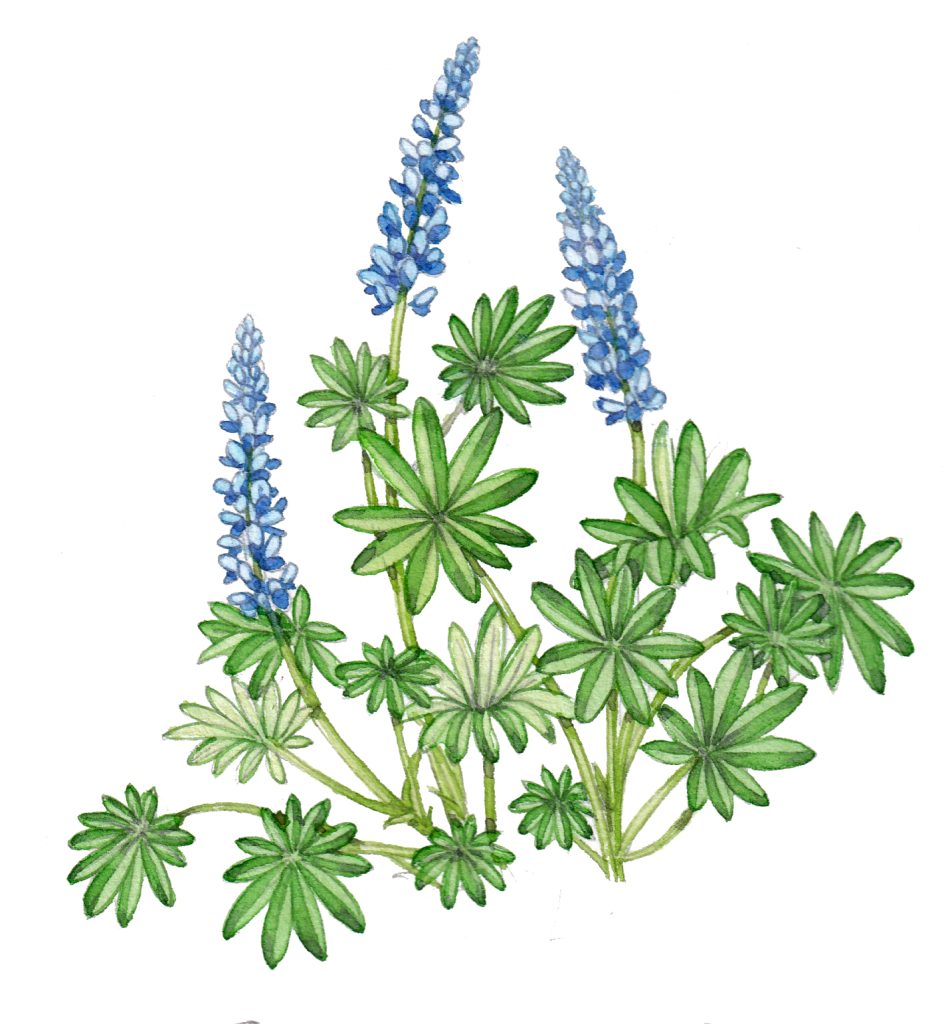
Habit sketch of Lupin, Lupinus polyphyllus
Research: Gathering reference
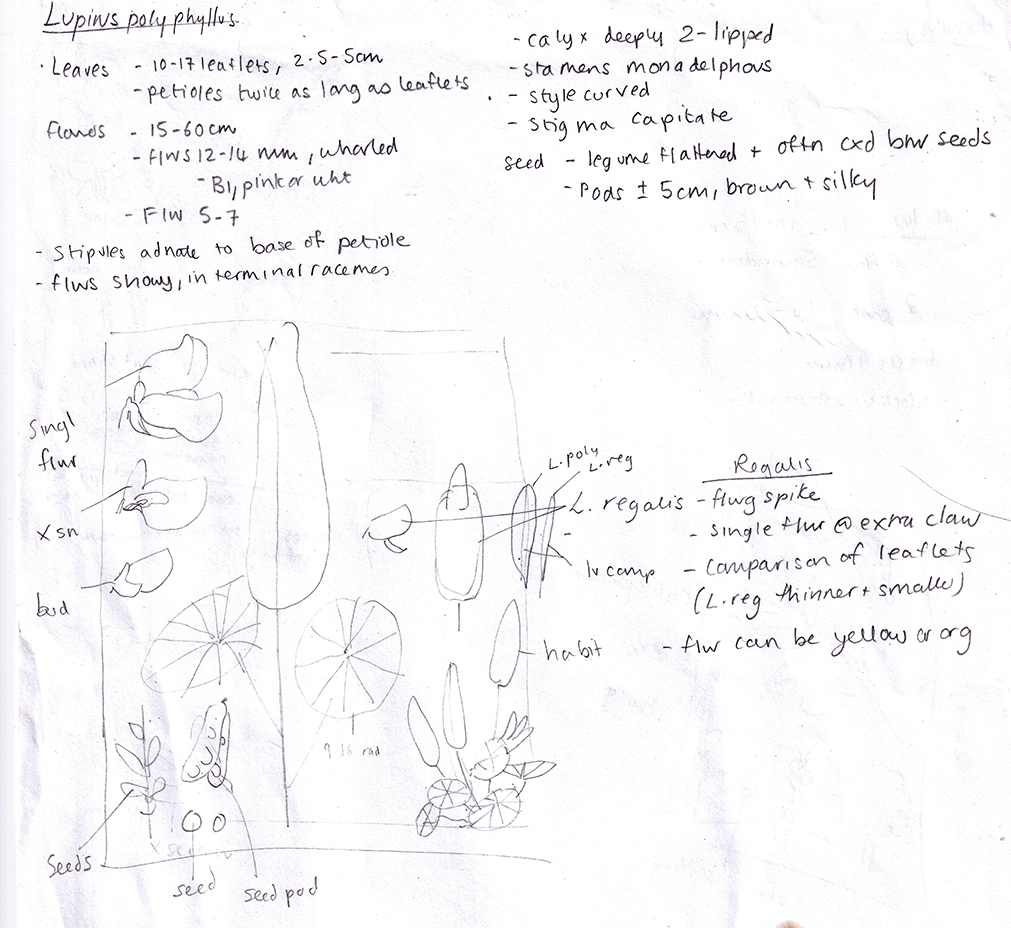
The first step is to co-ordinate and gather information. I know that there need to be sketches and notes on leaves, flowers, and seeds. Along with a habit or growth sketch, there also has to be a comparison between Lupinus polyphyllus and the garden lupin Lupinus x regalis. Lupins hybridise readily which adds confusion when figuring out differences between species.
My normal reference books don’t cover these species, as neither are common garden escapes in the UK. (Flora of the British Isles by Clapham, Tutin and Moore (3rd ed) and New Flora of the British Isles by Stace are excellent for information on wild plants.)
Luckily, Collins Flower Guide by Streeter, and The Wildflowers of the British Isles by Streeter and Gerrard include visual and written descriptions.
Online resources are good too. There’s NatureSpot, the Invasive Species Compedium, and Kew’s Plants of the World online. In a pinch, you can look at Wikipedia as well, but it’s important to be on the look out for mistakes.
I take notes from lots of sources, then amalgamate them into a list of details to include.
Research: Gathering images
Once the written research is done, I know what specific details I need to get photos or illustrations of. In an ideal world, the lupin would be in flower and I could draw from life, but at the time of writing (spring) nothing is in bloom, and certainly no lupins.
I use the same visual and online references as before, always cross-referencing photos with written notes and other images of the plant. It’s so easy to label a photo incorrectly, and I’d hate to perpetuate the error.
Thumbnail sketches
With all the reference sorted, I start plotting how the image will look on the page.
I plan where the central lupin illustration will sit, then add the details around the edges. I have to leave space for written notes as well as for the images.
Thumbnail sketch with information and images required
Details of the Lupin and materials
I use the same materials I always use. Winsor & Newton watercolour paints, a propelling P205 Pentel mechanical pencil, Winsor & Newton series 7 brush (size 1), and I’m working on Fluid 100 hotpress paper.
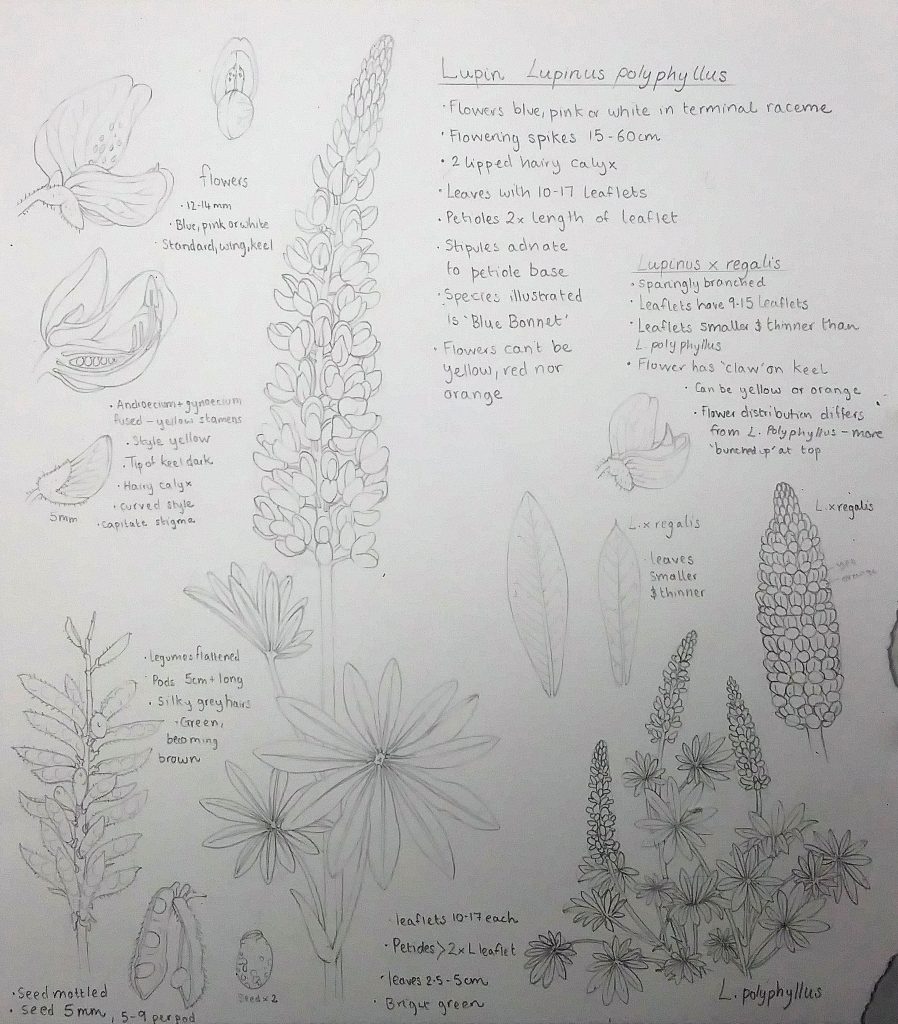
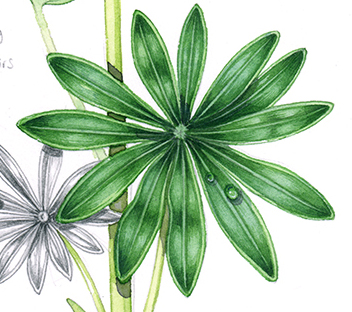
The leaves are made of 10 to 17 leaflets, each being 2.5 – 5cm across. The petioles are twice as long as the leaflets. These leaf-facts can easily be added to the main plant. I add water droplets as one of the things I always notice is how silvery they look in the centre of each leaf.
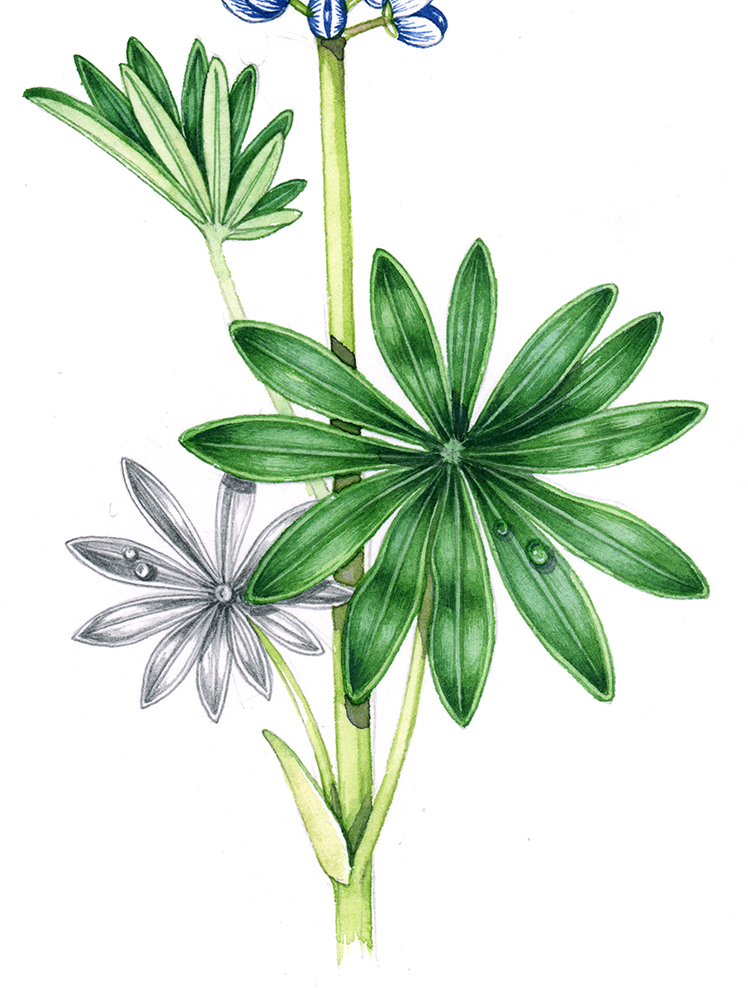
Finished piece: Leaves of the lupin
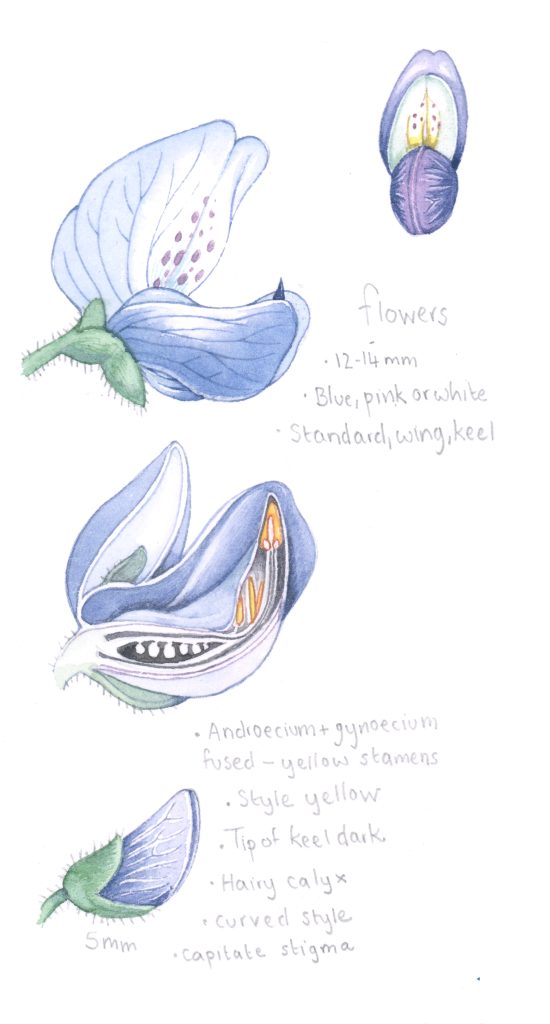
The flowers are showy, carried in terminal racemes. Each one is 12-14 mm long. The calyx is two-lipped. The style is curved, the stigma is capitate (shaped with a blob at the top), Stamens are monadelphous (the filaments are fused into a tube).
Seeds are legumes (like peas and beans), in flattened pods. Pods are silky and become browner with age, and there may be contractions between the seeds. Seeds are mottled, with 5 to 9 appearing in each pod.
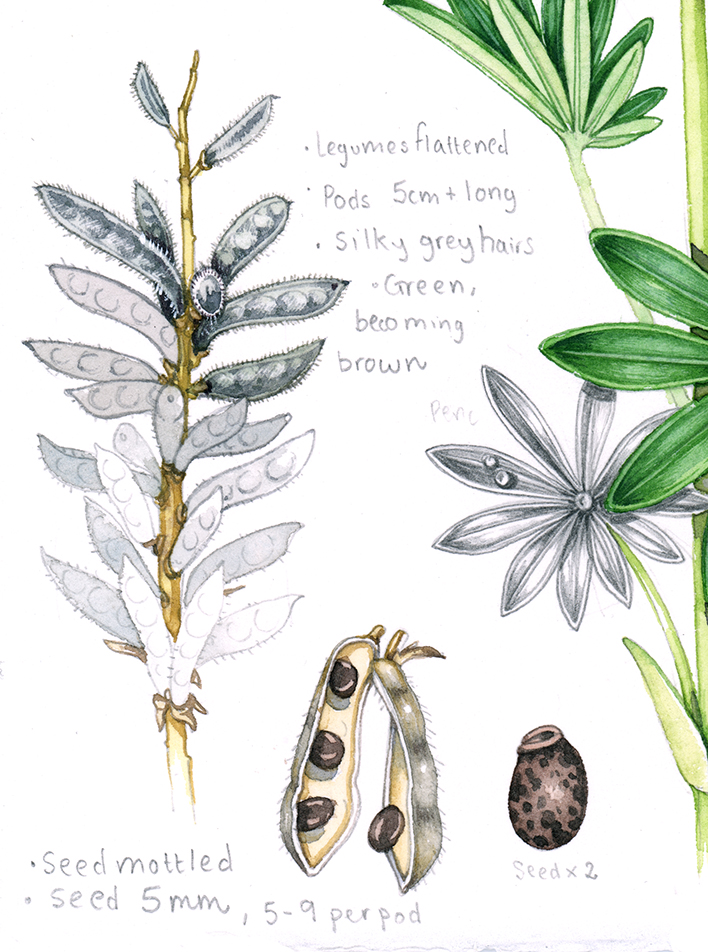
Finished piece: Seeds and seedpods of the Garden Lupin
Comparison to Lupinus x regalis
L. x regalis has smaller and thinner leaves. This can easily be shown with two leaflets presented as line drawings, side by side.
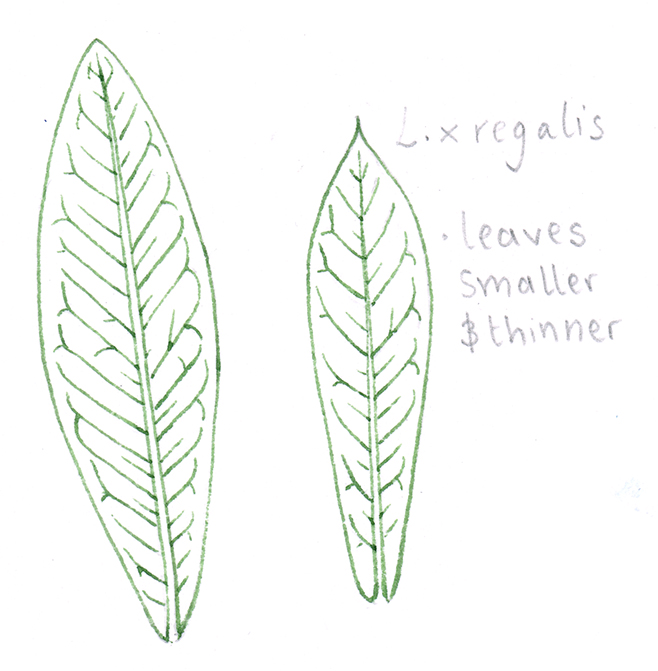
Comparison line drawing of the leaflets of two lupin species
The flowering spike looks different, chunkier and more compact. Flowers are bunched up towards the top. Each flower has a prominent claw on its keel. Unlike L. polyphyllus, L. x regalis has 9 to 15 leaflets per leaf. The petiole is shorter. Flowers can be orange or yellow; these colours don’t occur in L. polyphyllus.
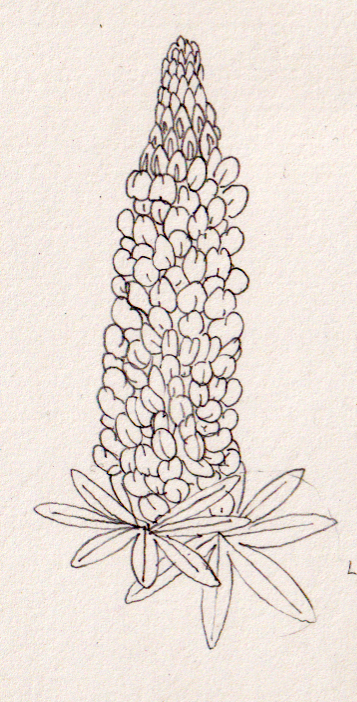
Pencil rough of flowering spike of L. x regalis
This is pretty straight-forward. Along with the leaflet comparison, there will need to be a habit illustrations of L. x regalis with orange and yellow blooms.
Deciding where to place different elements
It’s important to help the eye travel around a composition, and to keep similar bits of information near one another. Heavier illustrations, such as the habit drawing, need to be at the base of the page, to anchor it. Because of this, I place this at the bottom right. As a result, the details and illustrations of the seeds and pods fit in the bottom left.
The top left is used for flower cross sections from different views, and notes explaining the fusion of stamens.
The lupin sketch is wider at the base, so there’s room for written notes next to the flowering spike. There’s also room for the comparison notes. The line drawing of the two leaflets fits in here, as does a study of a Lupinus x. regalis flower.
Pencil rough of the Garden Lupin, awaiting colour
The habit sketch of L. x regalis needed to be changed as the client wasn’t sure it felt right. I rubbed it out, and the sheet instantly felt far easier to view.
The colours of the L. x regalis are far brighter than the gentle blues of our main lupin, so I decide to do the habit sketch on a separate sheet. This means the eye won’t be distracted from the blue flowers, and makes the main lupin sketchbook sheet a more attractive finished piece.
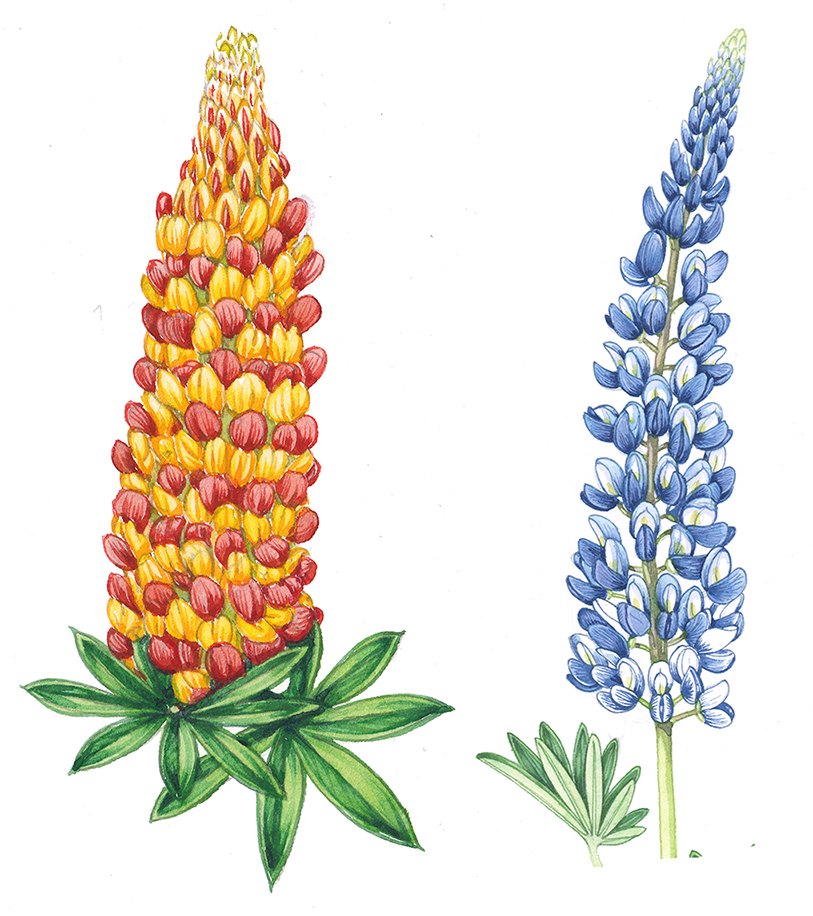
Comparison of Lupinus x regalis and Lupinus polyphyllus flowering heads
The two flowering heads can sit alongside one another thanks to pasting them into position with Photoshop.
Applying watercolour
Once drawn up, I decide what medium to use for each part. These decisions change as I paint. The cross-sections of flowers were going to be simple line illustrations. Colours, yes, but without detail or tone. However, once I got onto them I enjoyed painting them so much that I was loathe to stop.
Lupin flower cross sections and different views
Similarly, I planned to have two of the three leaves in graphite. I changed my mind at the last minute as I feel the balance between colour and monochrome worked better with two leaves in green.
The green was tricky to mix. It was based on cobalt green, with yellow ochre and cadmium yellow light. There was also a touch of Vandyke brown and purple.
Lupin leaf
I adore the blue of the lupin flowers. It’s a mix of Cobalt blue, a touch of purple, some opera pink and a drop of Doctor Martin’s Hydrous inks. These inks mix in with watercolour and give a real kick to any colour. The blue used here was Ultramarine.
The line drawings of the two leaves worked, and showed the differences in size and shape. I normally do such drawings in pencil, but will use the technique of a coloured line drawing again. As always, all painting was done with my Winsor & Newton series 7 brush.
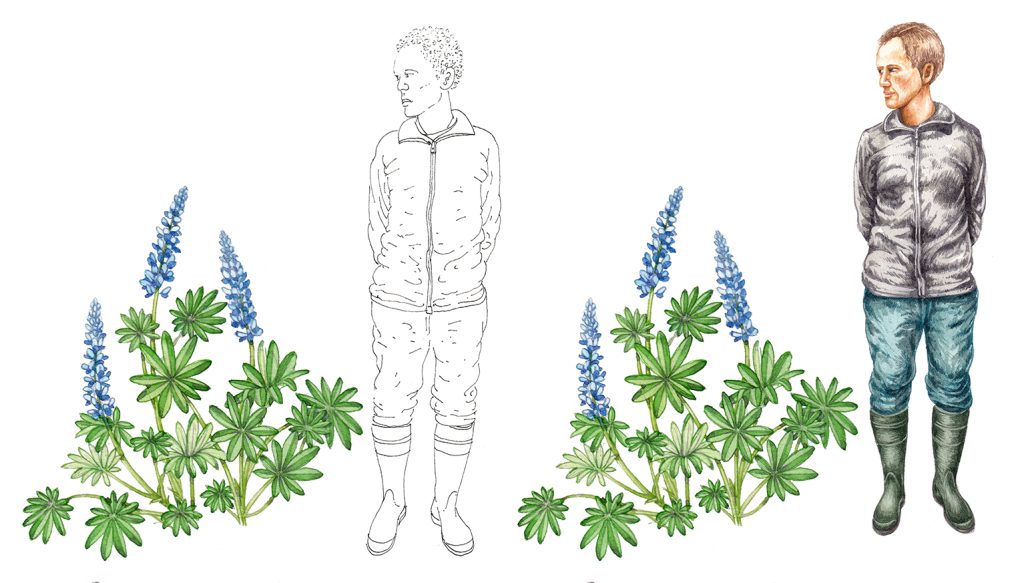
Scale drawings
The final step was to provide a scale illustration, showing the size of the lupin plant next to a person. I hate illustrating people, and am not good at it… Providing a pen and ink and a full colour version gives some choice to the client. I prefer the line drawing, and I’ll be interested to see which one the client ends up using.
Scale drawing of Lupin
The finished piece
Finally, it was complete. All the elements had been researched, laid out, annotated, and illustrated. I hope this way of conveying a lot of information is as useful to others as it is to me, it’s a helpful combination of written and visual facts.

Finished Garden Lupin sketchbook study page
The clients like the illustrations, and have already shared some of the information boards that they’ll be using at a horticultural conference.
I hope this blog gives an idea of how you go from the name of a plant, to a finished study. Of course the information you need to include varies from species to species, but the lightness and flexibility of the sketchbook format is something I’m very fond of.
Lupin sketch in situ
Thank you for this very helpful information. Study pages are something I have been struggling with, never satisfied with my results. It was enlightening to to see that for something informal, your method still involves some planning, which may be a key to improving mine. Thank you also for all your other informative and helpful posts, really useful for someone without direct local access to botanical teachers.
Hi Jean
Thanks for this. Yes, a little bit of compositional planning can be helpful, although sometimes I don’t plan too tightly. I also have a bit of a mind map which works for most subjects; tending to have a big study at the top, with graphite mostly on the left and paint on the right. Then there tends to be seed and flower details below or to one side. Habit sketches of the whole plant seem to end up bottom right. And also, even an informal study can take a couple of days. I like to let my interest take me in whatever direction, so sometimes I end up with lots of flower cross sections, sometimes with various leaf shapes, sometimes I get obsessed by the network of veins on a leaf. Allowing your interest to dictate what you illustrate is useful, and keeps you inspired.
I know, not having access to tutors can be tough; although I guess it’s a common problem right now with Covid. There are, I believe, some good online courses offered, it’s worth having a look around. Julia Trickey is very good, as is Sarah Morrish (who goes by “Nature’s details”). And of course lots of us botanical illustrators do Youtube Videos showing the steps involved. These may (or may not) be relevant and useful.
But thanks so much for the positive feedback. Im doing more of these for FOR now, and today Ill be researching Cotula or Brass-buttons and the common Blue Sow Thistle. How lucky am I?
Yours
Lizzie
Hello Lizzie,
I came across your fascinating website while searching ‘tree lupins’ for some drypoint illustrations of the invasive weeds in our local braided river, the Waiaraki/Eyre River. I live in the South Island of New Zealand where these rivers host many bird breeding sites. The birds lay their eggs in the shingle beds and the exotic weeds unfortunately take up too many nesting places. Thanks for sharing your steps – it was very helpful to understand the structure of the flowers and seedpods during the winter-spring here! I am working towards exhibiting in a group printmaking show at our local art gallery. Thanks again.
Hi Celia
This is fascinating. Yes, of course. Invasives and ground nesting sites. I’d not considered that. Glad the blog was useful, and good luck with the exhibition! I love a bit of printmaking, especially botanical subjects.
Hi Lizzie, I came across your beautiful lupine sketch as I was looking for images for out groups logo. I wonder if you would give us permission to use your sketch as an inspiration for our logo design? If you email me I’ll send you our design idea. Thanks so much. Diane
THANKS TO ADMIN OF POST FOR SUCH GREAT INFORMATION. I LIKE YOUR BLOG POST AND SUBSCRIBE YOUR BLOG FOR ALL YOUR FUTURE POST.