

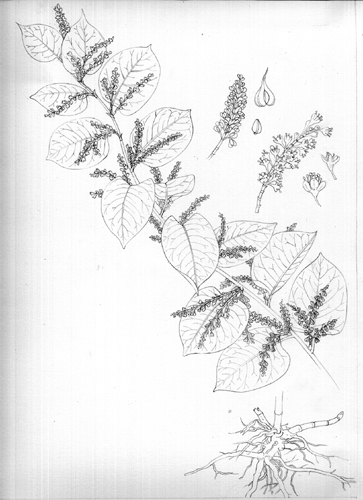
Japanese knotweed sketchbook study
Japanese Knotweed job
I’ve been working on a series of three scientific illustrations of invasive plants this week, for Summersault Communications. This blog is about doing a Japanese knotweed sketchbook study.
The article accompanying my illustrations will explain how to identify the plants and why they pose a threat. I am fortunate in that the commissioning art director has asked for the images to be in my botanical illustration sketchbook style, which is my favourite way to work.
Painting a leaf step by step: Pencil rough
Having been asked by various people (including some members of the Botanical Art for Beginners group) to explain some step by step processes, I thought I’d break down the stages involved in painting a single leaf of a sketchbook study. Instead of scans, I’ve relied on photos, so apologies if the resolution isn’t brilliant.
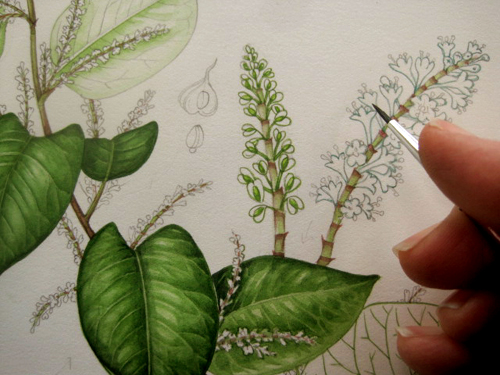
Initially, I draw the plant in pencil line. For this job, I am very aware of where the accompanying text and other elements of the layout will fall.
Painting a leaf step by step: Mixing greens
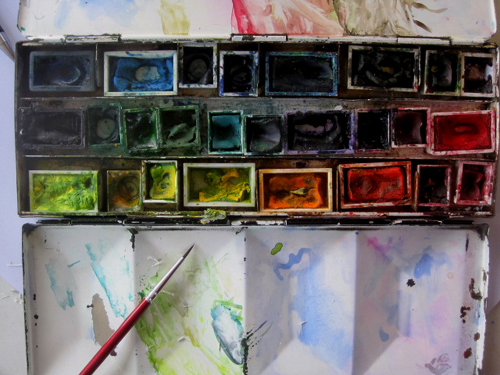
Then I apply areas of colour. The first step is to mix a green. For the bright , flat green of these leaves I used sap green mixed with cadmium yellow light, yellow ochre (to take the artificial edge of the colour away), french ultra-marine, and a touch of burnt umber. I use pans of Windsor and Newton watercolour, and top them up from tubes of the same paint when they run low.
I tend to favour sable brushes, Winsor and Newton series 7 or similar, and probably a no. 1 or no. 2 size. Today I was using a no.2.
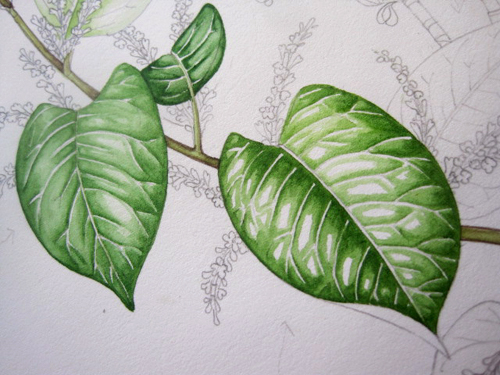
Painting a leaf step by step: Plotting in the darkest areas
I decide on a light source, and, observing my reference material closely, plot in areas of green in the darkest parts of the leaf. I do this for one and then for the opposite side of the leaf.

Painting a leaf step by step: Midtones
Next, I water down my green and work gently into the edges of these mapped regions of shadow, softening them and giving colour to the rest of the leaf. I make sure the lightest areas remain white. Whenever I make a colour paler I do it by dilution with water as I find that adding white changes the colour completely and often muddies it too. There’s certainly a place for white when using watercolours (adding shine, mixing the blue of a forget-me-not or the yellow of a primrose), but I avoid it when making colours paler.
Painting a leaf step by step: Paler areas
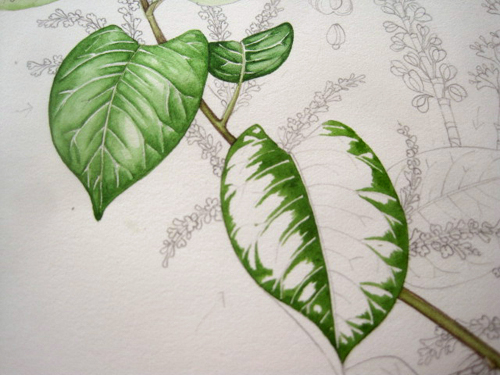
Next I work into the remaining light areas, leaving the palest regions and veins white. I apply a very pale version of the same mixed green to the rest of the leaf. It’s important to see the regions of dark and light both within the detail of the leaf and on the leaf as a whole. One side of this leaf is much darker than the other; this needs to be remembered.
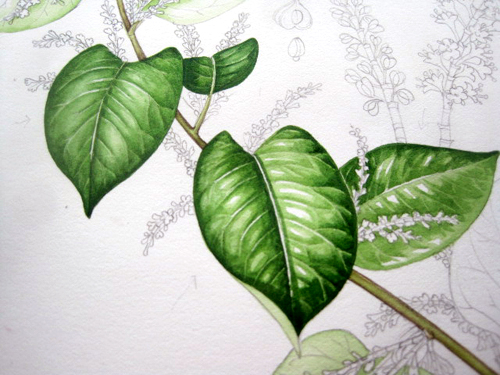
Painting a leaf step by step: Adding yellow hues
The next step is a very light green, with some additional cadmium yellow mixed in. The different areas of light and dark need to be unified into one leaf, and this wash helps to do this. The veins are still left white.

Painting a leaf step by step: Adding shadows
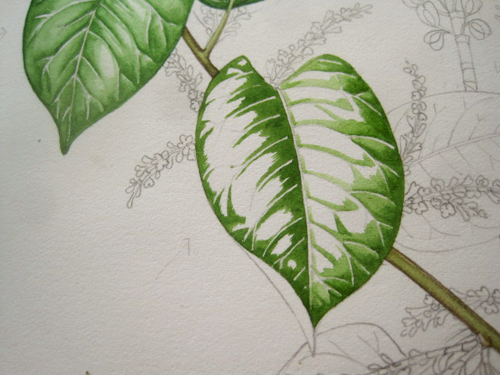
I enjoy the next stages since they help bring the leaf to life. I find the darkest darks and work into them; in this case with a mixture of vandyke brown, french ultramarine, purple, and a touch of sap green.
It’s sometimes a little alarming and stark to look at the illustration at this stage, but as before, subsequent work will soften the brutal edges of the shadows.
Painting a leaf: Top washes
Once these shadows have been blended in (again, with a more watery version of the same dark colour), it’s time to unify the whole leaf. I tend to do this with a wash of yellow ochre, mixed with a touch of green. This wash has to be very wet and quite pale, and covers the whole leaf (including the veins). Those of you with keen eyesight will see the leaf having its ochre wash applied is not the same as the one I’ve shown thus far. Apologies, I forgot to take a photo of that one at this stage.
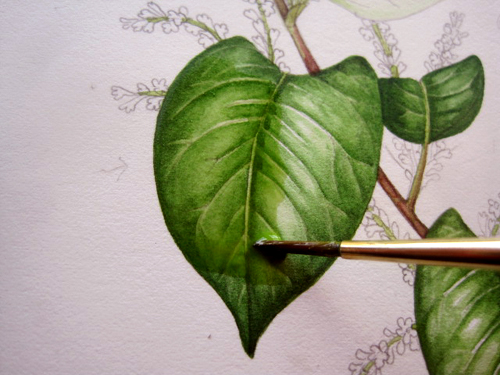
Painting a leaf: Working into the flowers
Once the wash has dried I may work a little more into the deepest shadows, or add a tiny touch of colour (something light and bright like cadmium yellow) to the veins. Then it’s on to the next area of the sketch, in this case the inflorescence and fruiting spike.
Finished!
The final illustration looks rather different to these photos of work in progress because it’s a scan, not a photo, but hopefully you’ll be able to spot the leaf I discussed on this detail of the larger image.
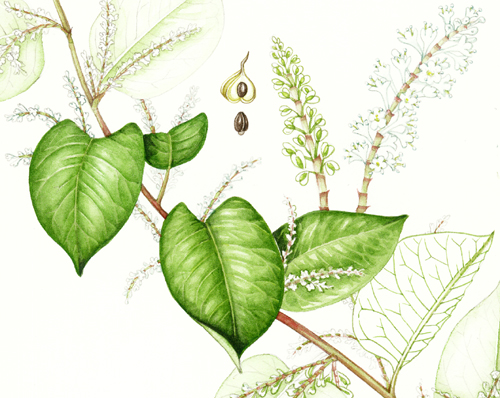
It may sound like a long winded and arduous process, but it gets quicker with practice. This whole study was completed in 5 hours, so it’s not impossible to earn a living from painting in this way. Not easy, but not impossible. And just to show that no matter how hard I try, I still have a squalid paintbox; here is mine right after I’d finished the Japanese Knotweed illustration. And they suggest keeping your yellows pristine, if only…
Hi Lizzie,
It was by accident that I came into your blogg.
I’m a pensioner seven months ago and started my interest in painting, was quite ok in it. I love the details and your style is like mine. But I need to learn alot more on blending the colours, thanks for telling readers about the colours. Your paintings are so lovely, just love them.
Hi Yoke
How lovely to get your comment. Im so glad that some of what I discuss fills in the spaces in your own painting work, that’s wonderful to hear. Thanks also for your very generous words about my work!
Thank you very much for taking us through your brilliant work step by step.
Your paintings have inspired me to buy some books you helped illustrate. Thereby developing my botanical interest
Also to purchase the brushes you use .
After painting all my life I have finally discovered detailed work and the meditative rewards of painting with a triple zero brush
I am sure you have delighted and inspired many people
Huge hug
Love always.
Karolx
Karol
What a wonderful comment. You’re so right about the meditative nature of working with a tiny brush, I know exactly what you mean. Thanks so much for leaving a comment, and for buying books I’ve done the pictures for! Your support is much appreciated, and I’m so glad I’ve helped encourage you to expand your artist’s practice!
Yours
Lizzie
This has helped m no end I have re discovered painting while shielding but was struggling with layering and washed I just couldn’t get it right. This ha now inspired me to carry on I shall have your page open tomorrow for my next attempt
Thank you
Hi Rosyln
Layering IS tricky – you always think you might ruin everything or go too dark too soon. Both are possible, but you have to try things to find out what does and doesnt work, and Im really pleased this post has hints and tips that might help out.Hope youre enjoying your new-founs talent and art work, Im so pleased to be a part of that! Thanks for the comment.
What a wonderful tutorial. Thank you so much. I’ve become enamoured with painting leaves, not sur why, and this is one I will try, for sure. I’m a relative beginner, having just started watercolours a few months ago. This is very inspiring. Thanks again.
My absolute pleasure, Angela.
I should have read it before posting. Sorry about the mistakes, two busy double tasking:
Hi Lizzie, Would you be interested in painting the knotweed onto Japanese Knotweed paper (Home made).I could send you some. Councillor Kevin Griffiths supports my Japanese Knotweed reseach. How I wish he had more power over all our Councils, and other services. I am working on a project to save our Bees/Butterflies (pollinators) from dangerous pesticide abuse.
Here is some of my handmade Japanese Knotweed paper. My art is not great. But I hope to take lessons from my very clever arty daughter: https://www.youtube.com/watch?v=DviJZfp2cCk
I would like to gather art from all over the world from artists that have drawn/painted Japanese Knotweed, bees, butterflies, moths and other pollinators. Then I hope to put together a video with music of all the artists. Promoting their work with thier website links. I hope this will help struggling artists, and help save our little bee and butterfly friends. Here is an example of the video I would like to make. I know some amazing singers. My partner, daughter, and Avis. https://www.youtube.com/watch?v=TW5Pfaq3qXs Very much hope to hear from you.
Kind wishes, Sharon (Warrior Mumzee)
Hi Sharon
Thanks for this, and the email which I’ve replied to. I couldn’t agree more, helping pollinators is so important. Good luck with the project!
Thank you Lizzie. I always enjoy reading your tutorials. The far right hand white flower on Japanese Knotweed I think you have outlined it in green, and there is no shading at all is this because it is such a small flower? I would be tempted to put a little in and probably make a mess of it! Little white flowers are tricky.
Hi Sandra
You’re right, little white flowers ARE tricky. I’m not always consistent with how I handle them. Sometimes, if time is tight, I will just outline them and have done. Other times I work into them with very pale washes to suggest shadows. But like you say, it’s ever so easy to make a mess of little whites, by swamping them with colour. For things like cow parsleys, I often just rely on the initial pencil lines to show the flower edges. I’ve written a blog on ideas on how to tackle white flowers: https://lizzieharper.co.uk/2013/02/botanical-illustration-tips-on-painting-white-flowers/ and there’s a youtube video of me talking about the same thing: https://youtu.be/L3ar7Ffp9RY. Lots of different approaches. But I get it wrong quite often, leaving a flower looking incomplete or overworked. Guess it goes to how that no matter HOW long you’ve been illustrating plants for, there’s still so much to learn. Which, on reflection, is actually quite exciting. Thanks for the comment!