Natural History Illustration – Fixing errors
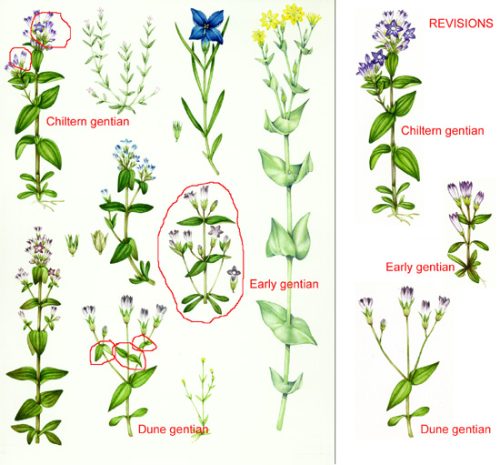
Scientific illustration and botanical art are similar to all other disciplines in one crucial way. Mistakes are made. This week’s blog explains how these happen, and how to fix those which are redeemable. Where relevant, I’ve marked up my illustrations with red to show where the mistakes are, or where alterations were called for.
Fixing Errors: Using White gouache
Sometimes mistakes happen which are beyond your control. I once got some dodgy masking fluid which left a sticky smear instead of a perfect white space. Since I’d already painted the nest around the area (which were to be blueish eggs) I refused to give up and painted the eggs in chalky gouache instead.
Another time, a finished painting of an avalanche rose got bent in half during posting. Despite repeated attempts to salvage it by re-stretching the page (did you know you can re-strech completed watercolours? They won’t bleed much, it’s incredible) the paper fibres were permanently damaged. The painting had to be done again.
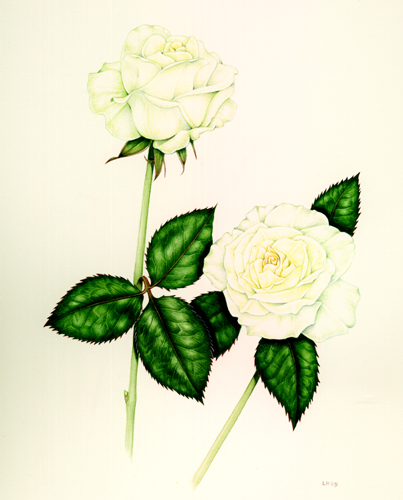
Fixing errors: Mending a splayed paintbrush
Paintbrushes splay. A good tip to get the point back is to dip the brush in egg-white and pop it in the freezer overnight. Obviously, rinse it before re-use. Sometimes delicate and judicious work with a sharp craft knife can remove the offending stray hairs from a faulty brush.
Avoid pools of colour settling where you don’t want them by always stretching your paper first.
Fixing errors: Sort them out at the Rough stage
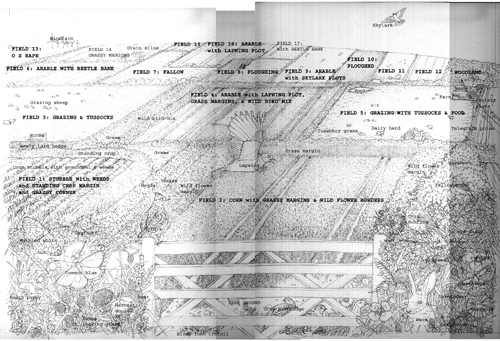
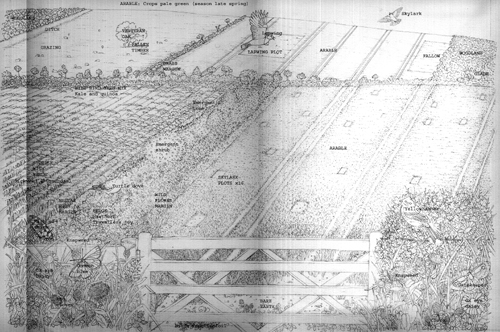
Roughs are the only way to avoid making terrible mistakes. I always send a client a pencil rough before putting paint down. Pencil has the miraculously wonderful quality of being able to be rubbed out, so alterations are easy. Below is a series of roughs done for Natural England which prove how much abuse one sheet of paper can take when it comes to rubbing out and re-drawing. They liked the final, and so do I.
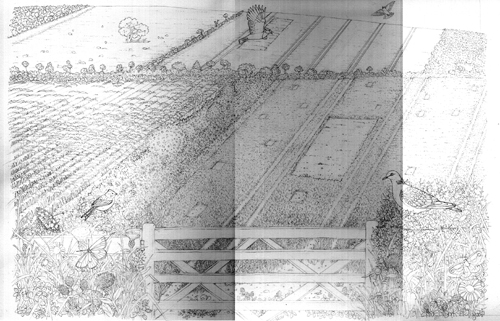
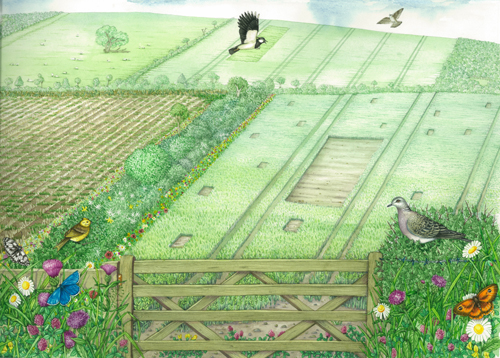
Fixing Errors: Pencil Palimpsets
Pencil can leave dents on a page, especially if you push hard or use a very hard lead. Luckily these shadow-lines aren’t obtrusive, and can be cleared away on any picture editing software. People who buy illustrations seem to like the dents where pencil lines once lay, perhaps they give a narrative to the creation of the image?
Mistakes in different mediums – emergency tips
The most crucial bits of kit I own, when it comes to fixing mistakes, are a roll of loo paper and a tube of permanent white gouache (I tend to favour Daler Rowney.)
Ink illustrations
Permanent ink can’t be erased. However, errors can be fixed in two ways. If the mistake lies in an area of shadow, you can deepen the darks with lots more stippling and cunningly hide the mistake. This is what I’ve done with this cat for Dr. Pitcairn’s Complete Guide to Natural Health for Cats and Dogs (area circled in red).
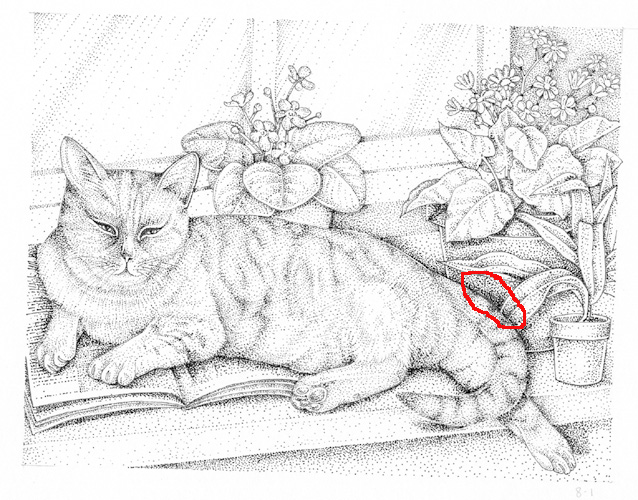
If the mistake is due to a line being where it should not be then crack open the permenant white gouache. Mix it thickish, and very clean. Apply. Although it’s clear to the naked eye where this smear of thick white paint has been used, amazingly, in reproduction, it does not show at all. The only drawback to this method is it’s considered a bad idea to sell original art works which have been tweaked in this way.
Watercolour illustrations
Watercolour mistakes can be fixed as long as the paint isn’t fully dry or too dark. You simply wash the mistake out with clean water and a clean brush, scrubbing very lightly (if you scrub too hard you destroy the surface of the page and make it woolly). Even easier, if it’s a very pale or dilute wash that’s gone wrong, or a colour seems too intense once on the page then just use tissues to blot it up. Again, covering up mistakes with white gouache works too, so long as the underlying area of colour doesn’t seep into the white gouache (and you don’t plan to sell the original).
Fixing Errors: When Clients change their minds
The bane of my existence is when clients fail to make the necessary alterations at the pencil rough stage, and ask for alterations once they’ve seen the final artwork. Obviously I understand why this happens, roughs can be really hard to interpret and mistakes will become glaringly obvious once the picture is coloured up, but it makes for a much harder life, especially since the paint will have fully dried by the time the alterations are required.
However, the client is always right. Below are three examples of changes that had to be made to finished artworks.
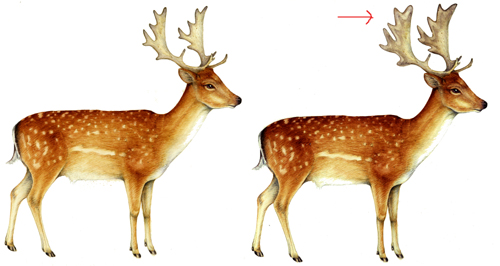
First, the axis deer, done for ZSL Whipsnade. The antlers needed enlarging. Tricky, since it meant taking definition of the existing antler edges away, and encompassing them within a new antler perimeter. Even trickier since the original was right at the top of a page. I ended up glueing bits of paper to the edge of the sheet, painting the new antlers on these, then spending a long time with the “clone tool” on photoshop making it look like I hadn’t glued two bits of paper together. If you look closely you can definitely see the previous edge of the antler within the new ones.
Making big changes to an illustration: Dragonflies
The hardest alterations are those that involve covering up a dark area, then painting the revised form on top of this pasty bed of white gouache. This cover for Jersey Post’s upcoming release of stamps, Dragons and Damsels (on sale this July 4th), had to suffer such treatment.
My advisor was an extremely erudite and generous member of the British Dragonfly Society, and his quest for complete correctness was entirely appropriate. However, when I was told to totally alter the shape of the wings of the banded demoiselle in the bottom right; to change the migrant hawker’s thorax to a browner shade instead of green; and to alter its anal appendages, I could have wept.
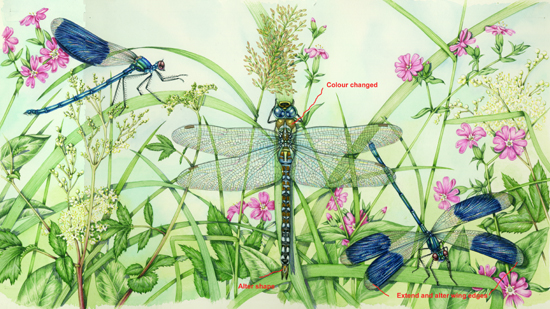
The wings were a nightmare, let’s be honest. Layer on layer of white gouache was required to cover the existing edges and blue patches. The blue keep bleeding through into the white. It was all getting muddy. Then, on top of this unappealing smear, I had to repaint the intricate detail of a damselfly’s wing venation. And add appropriate colours to each wing cell. The alternative was to re-do the entire piece, which had taken weeks. I gritted my teeth and I’m pleased to say unless you KNEW, I’m not sure anyone would notice the alteration. The other changes were far simpler, a brown wash on top of the thorax, and an enlargement of the appendages which just meant repainting them further over the blade of grass.
Fixing Errors: Switching out whole species!
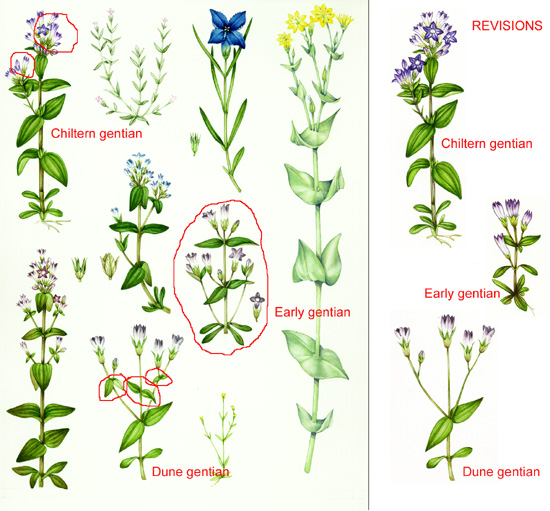
Finally, I had three serious alterations to make to one of the flower plates done for Harper Collins Flower Guide by Streeter, long after the rough had been approved. On one plate, there was one species whose flowers needed enlarging (Chiltern gentian). This was done by painting them bigger; luckily for me the corolla colour was darker than the buds clustered behind. The next species needed to have some upper leaves removed (Dune gentian). Hooray for process white gouache! Finally, one required a total re-paint (Early gentian). What was excellent in this case was that the revised plant could simply be slotted into the plate, thanks to computing. Below is the plate before alterations, and the revised plants on the right are those which appear in the published volume.
Fatal Errors: When it’s time to give up
Sometimes illustrations can’t be redeemed. That sick feeling you get when you realise you’ll have to start again (oh WHY didn’t the client make the changes at the rough stage!); or the horror as your cup of tea pours onto an illustration of a white flower. Aphids, so unobtrusive in life, create indelible and enormous smears if crushed inadvertently onto a page. Look out for them. And for children testing felt-tip pens.
Sadly, the best way to avoid having to fix mistakes is to not make them. As the years go by, I think there are fewer to fix which are my own fault. But the whims of a client need to be upheld, and sometimes things do go wrong. It’s just worth remembering that it doesn’t necessarily mean you can’t redeem the illustration. The main skill of being an illustrator, I reckon, is knowing how to minimize or hide mistakes. Give it a go, you may be surprised by how easy it can be…

