

Orchid Botanical Illustration Step by step

Orchids have always been a bit of a mystery to me, so when I was confronted by the Early Marsh Orchid, Dactylorhiza incarnata ssp coccinea my heart did not leap. It’s one of 13 plants I’m illustrating for a wildflower identification guide to the Braunton Burrows sand dunes system which will be published by FSC Publications.
If you’ve come from the youtube film and just want a printable PDF to work with, please scroll to the bottom of the page)
Learning about Orchids
I decided this was the perfect time to try and learn a bit about orchid flowers, so I could stop being scared of them. Consulting Common Families of Flowering Plants by Hickey & King, Understanding the Flowering Plants by Bebbington, and The Cambridge Illustrated Glossary of Botanical Terms by Hickey & King I pieced together a diagram. I drew it up and labelled it, and will use it anytime I’m asked to illustrate and orchid.
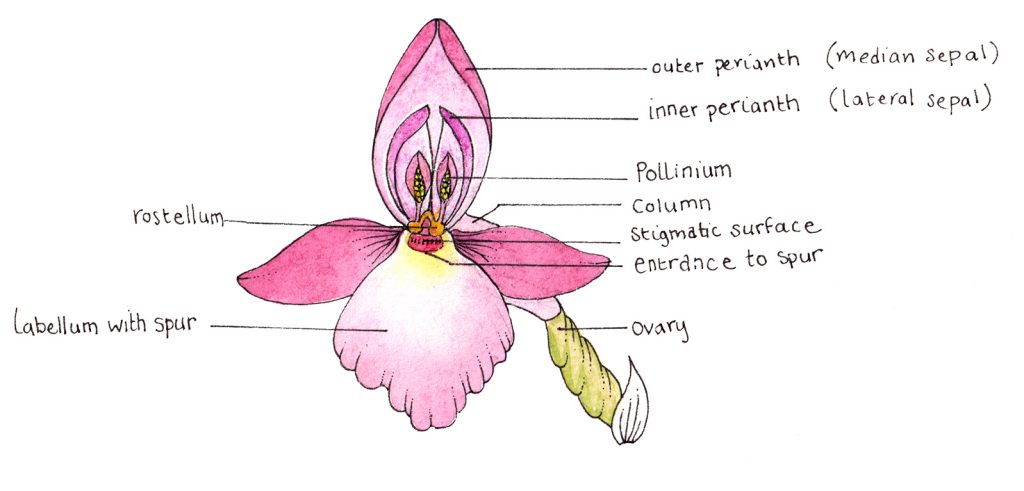
The take home message is that the whole orchid flower is twisted upside down. Yes, I know. But if you look at its’ pedicel (where the inferior ovary is) you can even see the twisted striations. Why? So that the large, flat Labellum petal can act as a broad landing mat for pollinators. Different types twist in different ways. Our Marsh orchid has managed a Resupinate twist, basically a 180 degree flip.
The Labellum, or base petal, often has a spur growing back from it. There are two wing petals, in the case of my Early Marsh orchid these are help up above the flower, like hands flung up in an act of surrender. Then there’s the Outer perianth and inner perianth(also referred to as the Median and lateral sepal). Inside these are the paired Polliniums.
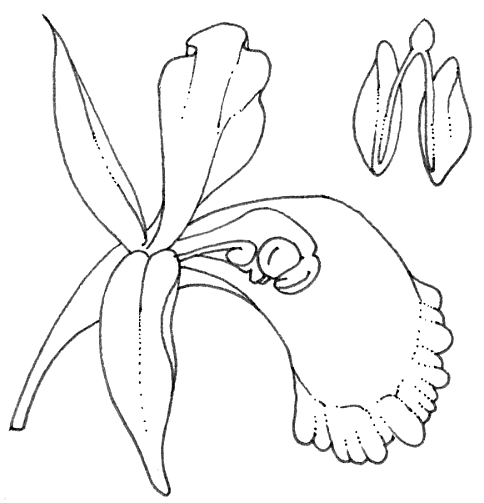
Diagram of a Pollinia and within an orchid flower
Orchid Reproduction
Orchids don’t always need insect pollinators and some can self-fertilize, but when they do want pollinating they are incredibly clever. Some mimic female insects to lure lust-filled males to them, then glue the pollinium to them. Others, like the Fragrant orchid, will glue the pollinium to the tongue of a feeding butterfly, perfectly positioning it to fertilize the sticky stigmatic area on the next orchid it visits. Pollinium get attached to legs, eyes, backs…and carried onto the next orchid where fertilization occurs.
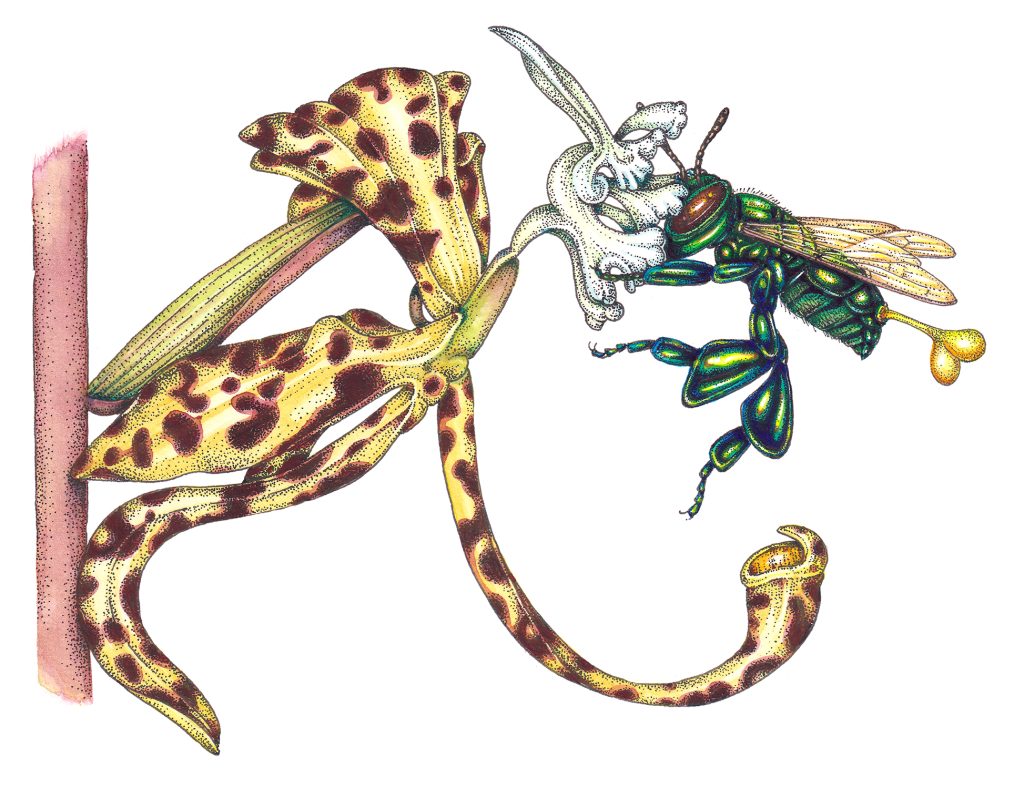
Orchid bee Euglossa cybelia with Cycnoches guttulatum orchid
Pencil roughs and alterations
The first pencil rough needed tweaking as the plant was too tall. This involved ditching a pair of leaves and re-drawing the bottom of the stem and the orchid bulb (pseudo bulb). Getting feedback from botanists is very welcome, it means I feel confident in the accuracy of my illustrations.
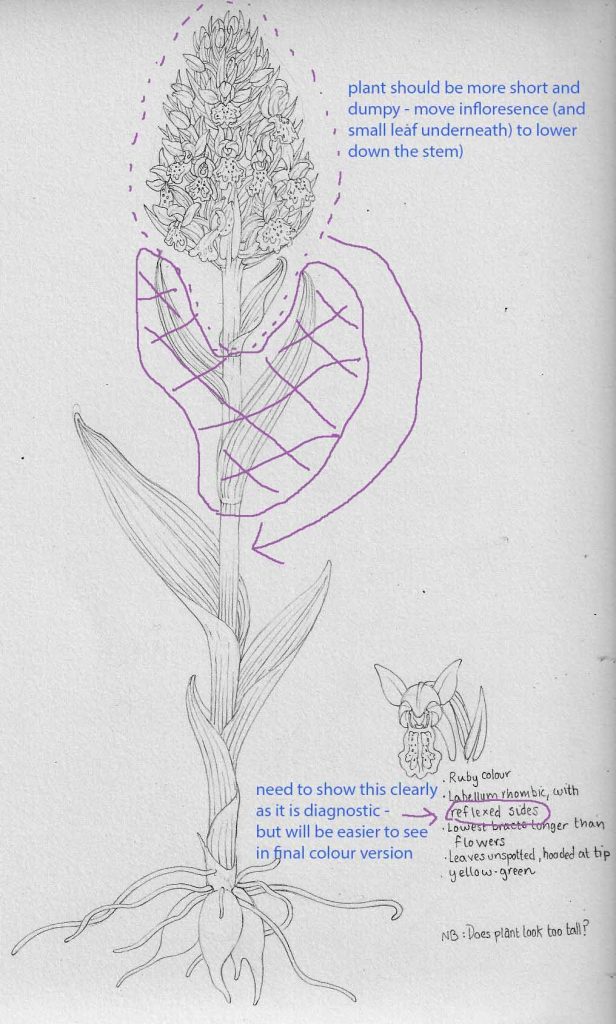
Pencil rough with feedback
Materials
I’m using Stonehenge Aqua hotpress watercolour paper, Winsor & Newton pans (topped up from tubes), and (incredibly for me) use the synthetic Princeton Neptune Round brush throughout. (For more on this, please check out my blogs on Synthetic alternatives to the Winsor & Newton series 7 sable brushes)
Leaves
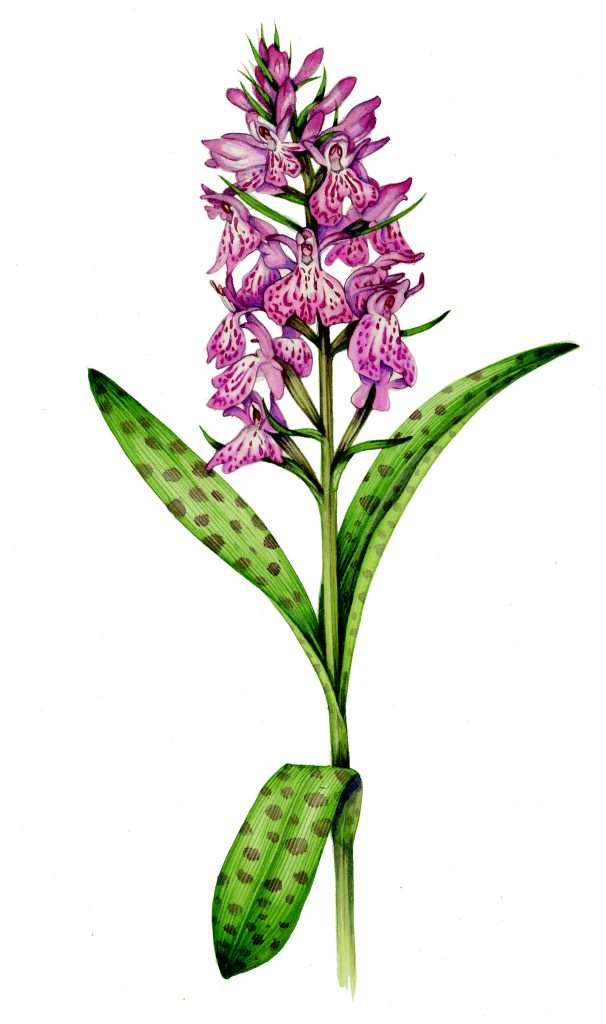
The leaves of this plant are described as a light, spring green, although they seem to vary a lot in the photos. However, unlike the Spotted orchids (close relatives), they are entirely green.
Common spotted orchid Dactylorhiza fuchsii
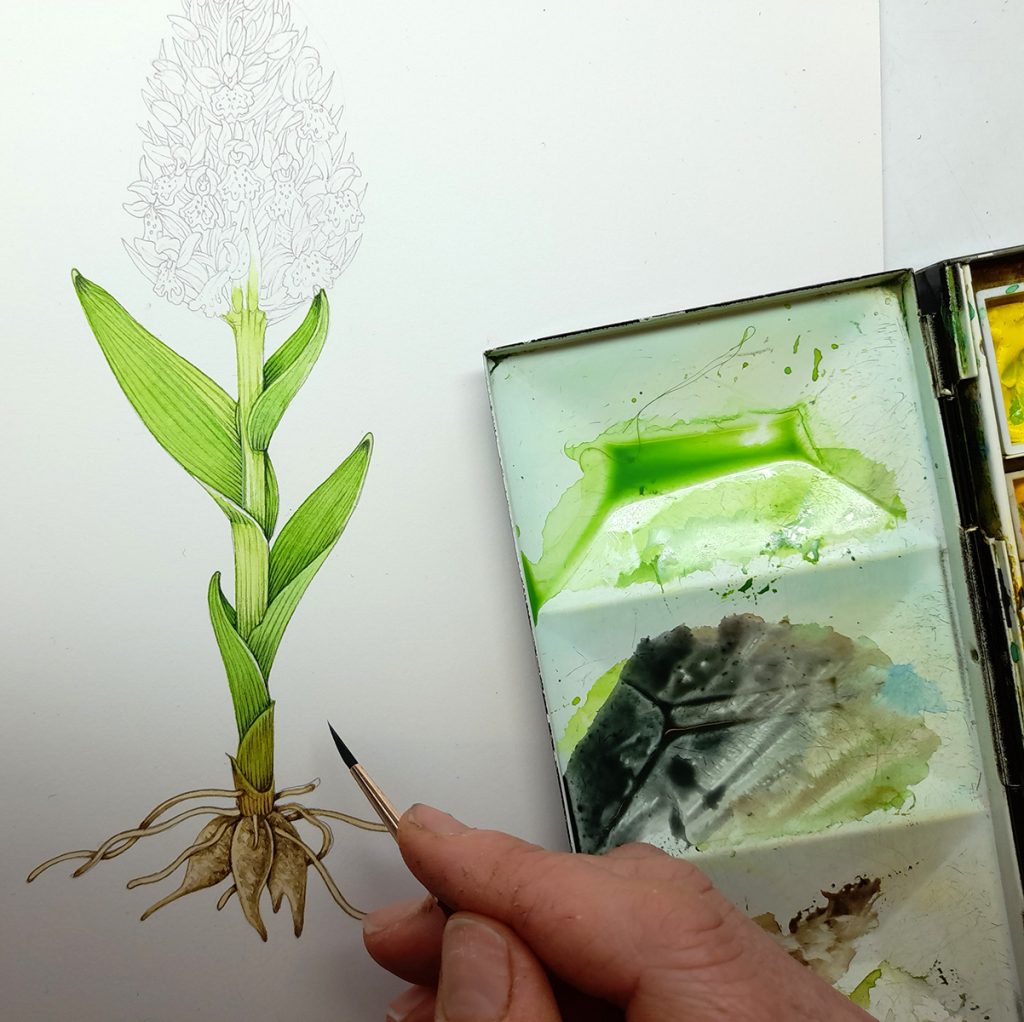
Mixing Sap green, Cobalt blue, and Cadmium lemon, I start by outlining wach leaf then plotting in the longditudinal parallel veins. Once dry, I make a lighter tint of this green by adding lots of water, and a touch of Cerulean blue. I paint this over all the leaves, then leave it to dry.
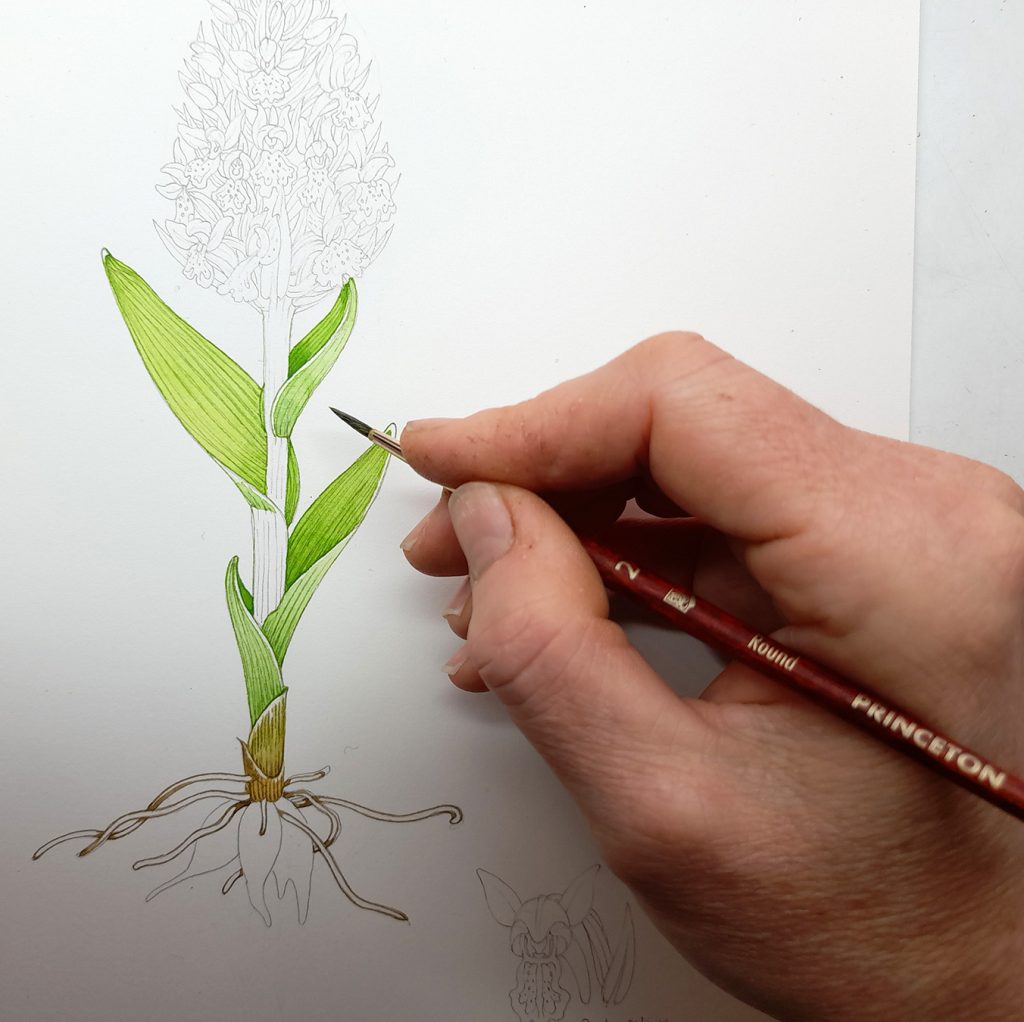
Another paler wash goes on top of this, and the difference between the underside and top of the leaf blade is suggested with a slight difference in colour (a little milkier and bluer below)
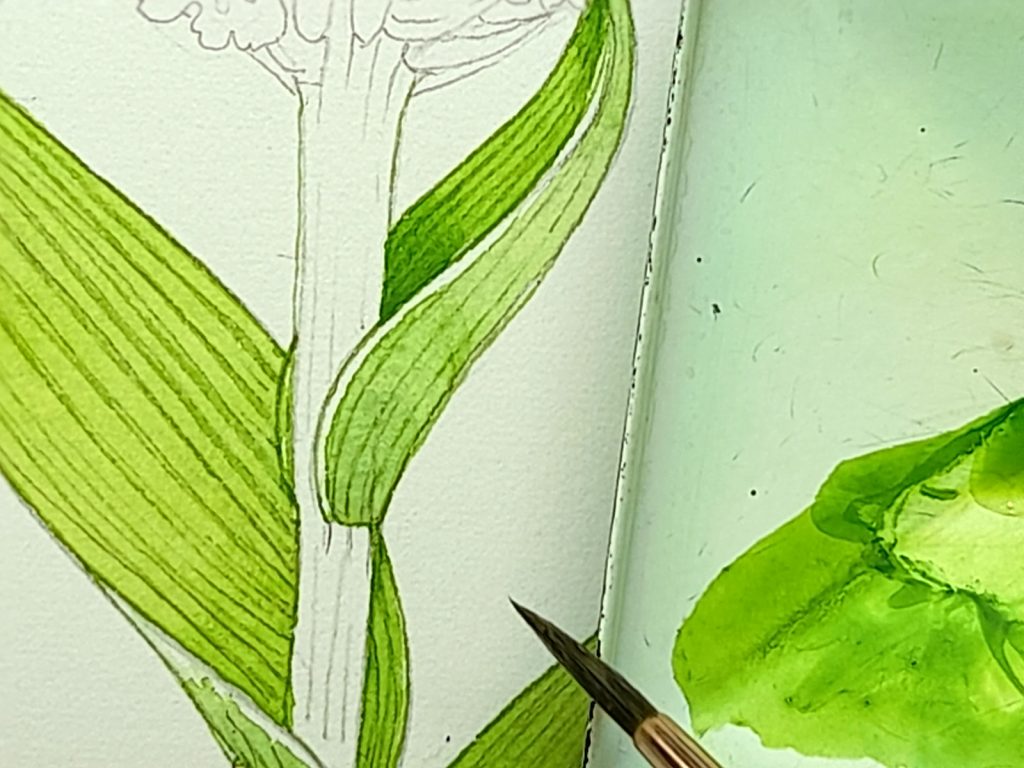
Once dry, I pick out the darks by mixing Sepia with Cobalt blue and a touch of Winsor Green (yellow hue). Go easy, you really just want these dark areas to show definition, not to darken the leaves.
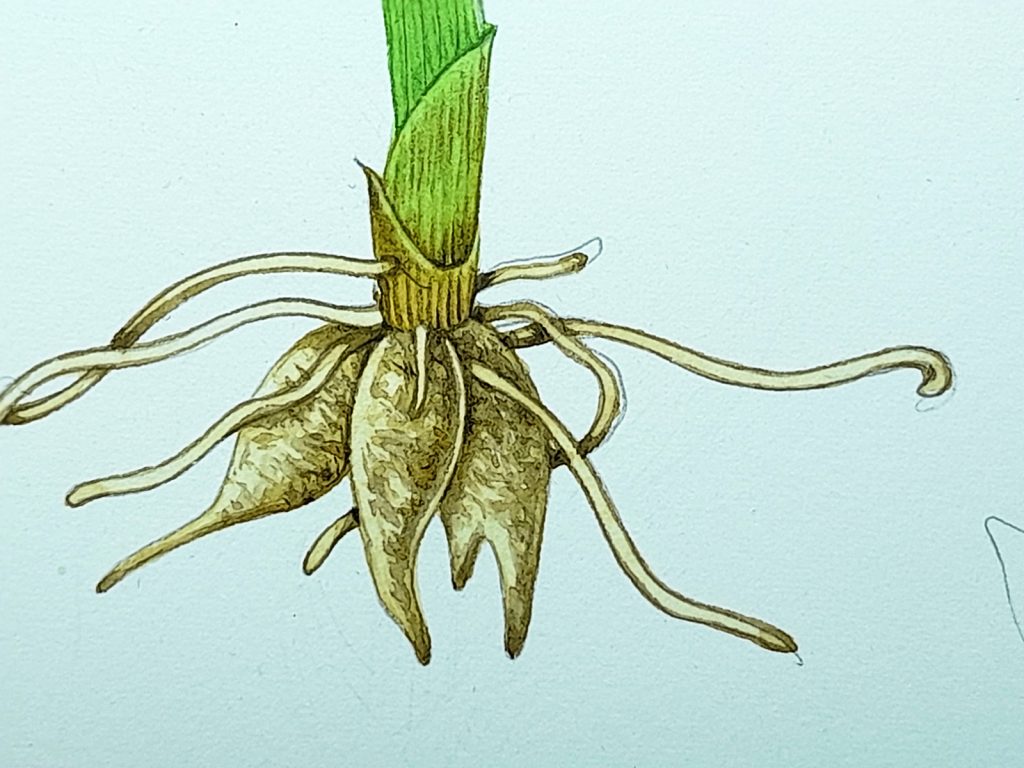
Roots
Each root is outlined in a brown made from Sepia, the green mixed for the leaf, and Yellow ochre. The pseudobulbs and plotted in with a pale brown made from Yellow ochre and Naples yellow.
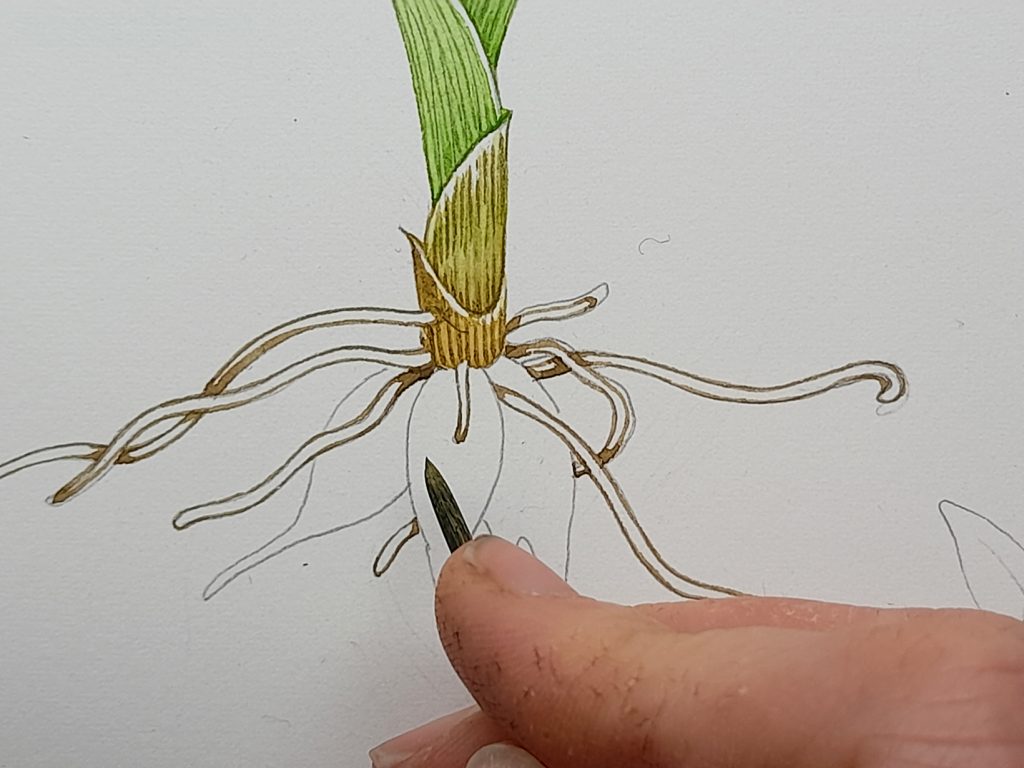
Whilst wet, I use tiny blobs of the darker root brown to add texture. When the paint is dry, I suggest shadows with a mix of Sepia and Cobalt blue.
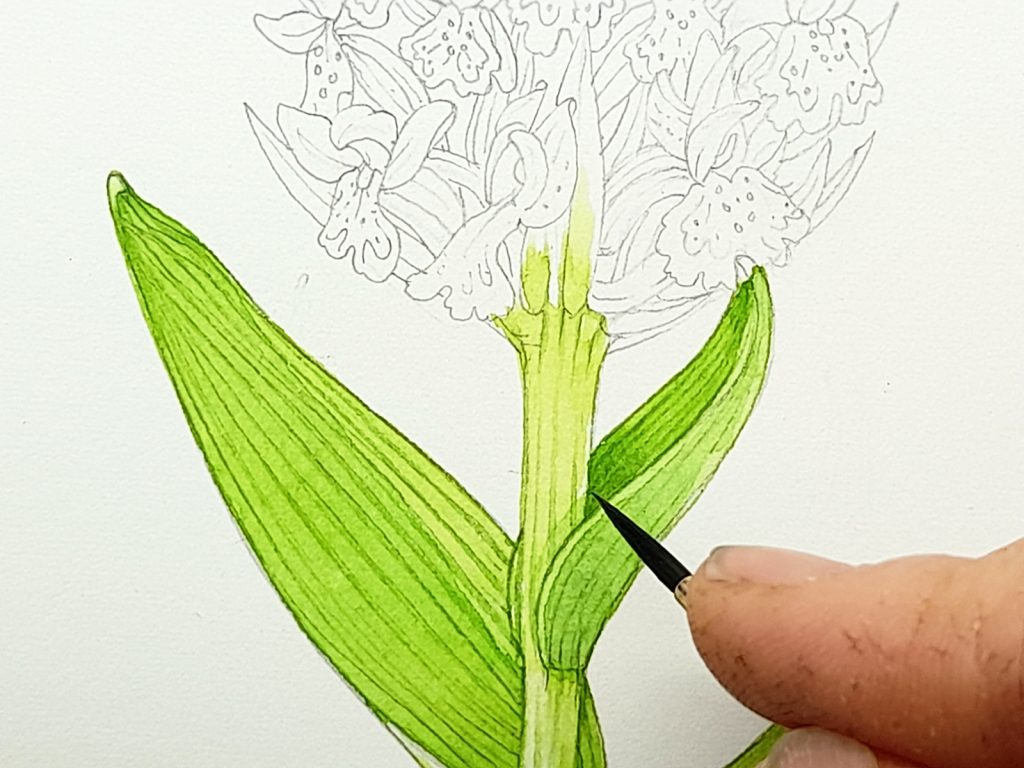
Stem
Using a dilute and yellowish tint of the greens, I paint in the stem, being sure to suggest the parallel veins and a slight shadow on the right hand side. traditionally, the light source in botanical illustration comes from the top left, so shadows behave accordingly.
Flowers
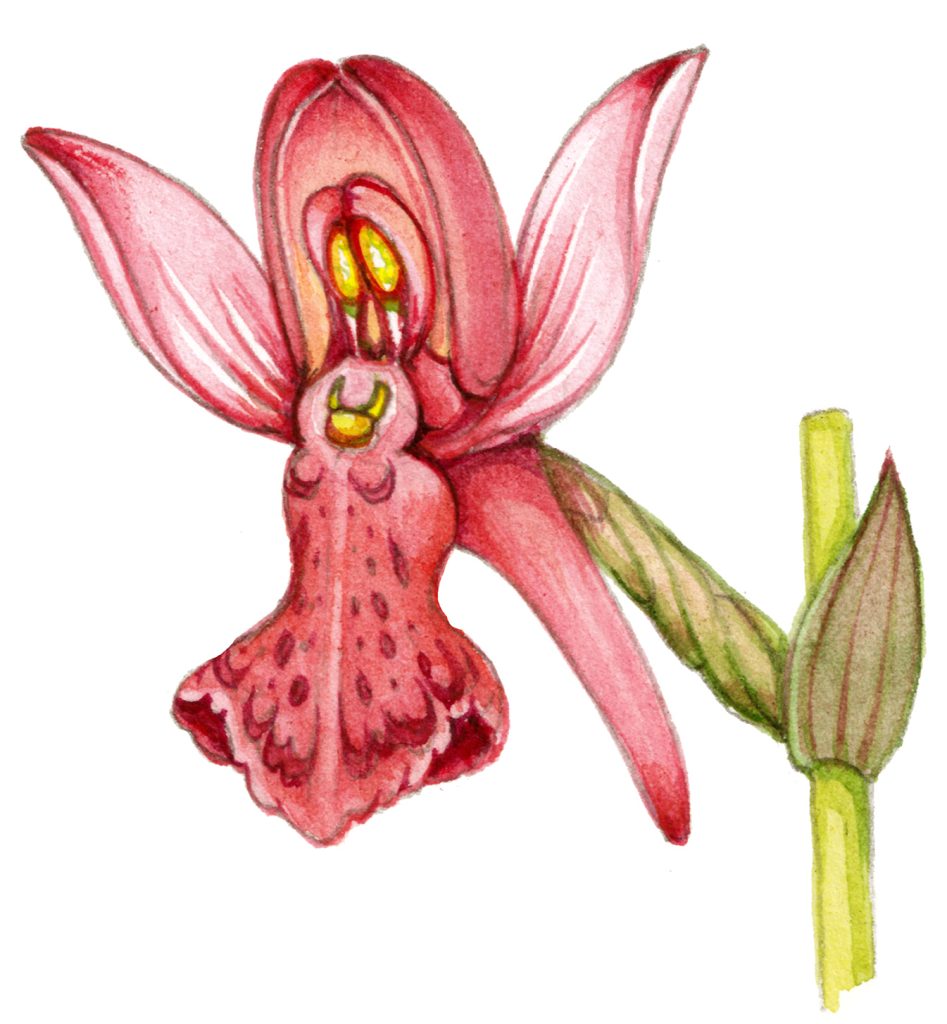
There are between 10 and 70 flowers per inflorescence on this species of Orchid, so it’s worth pulling out one flower and paitning it in more detail. I do this, and emphasize the twist in the column, The colour is vital in this sub-species, being described as “bright red”, “brick red”, “scarlet”, “orange-infused red”, and “markedly redder than other orchids”. Close and repeated consultation of all my reference gives it as something of a reddish maroon. I make this hue from Alizarin crimson, Cadmium red, and Opera rose.
The other vital diagnostic in the Early Marsh Orchid is that the sides of the Labellum are inflexed, curled back on themselves. This means the flower looks narrower than many similar orchids, and that the central keel of the labellum is raised, almost like the keel of a boat. This proved excrutiatingly tricky to illustrate, although I tried my best.
Flowers vs Bracts
I feel a bit weak looking at that big inflorescence, it’s s hard to figure out what’s orchid and what’s bract, or flower column. First thing to do is separate them out. So I paint in the bracts, thinking carefully all the time about what is and isn’t the flowering part. I use the same yellowish green as on the stem – sap green, cobalt blue, cadmium yellow and a whole lot of water. I add a touch of Daniel Smith Spring green watercolour. Once outlined, I paint over the tips of the top bracts in Alizarin crimson, aware that the flowering heads look red all over and no areas of clear green are visible.

Then I in fill with a dilute version of the initial green hue.
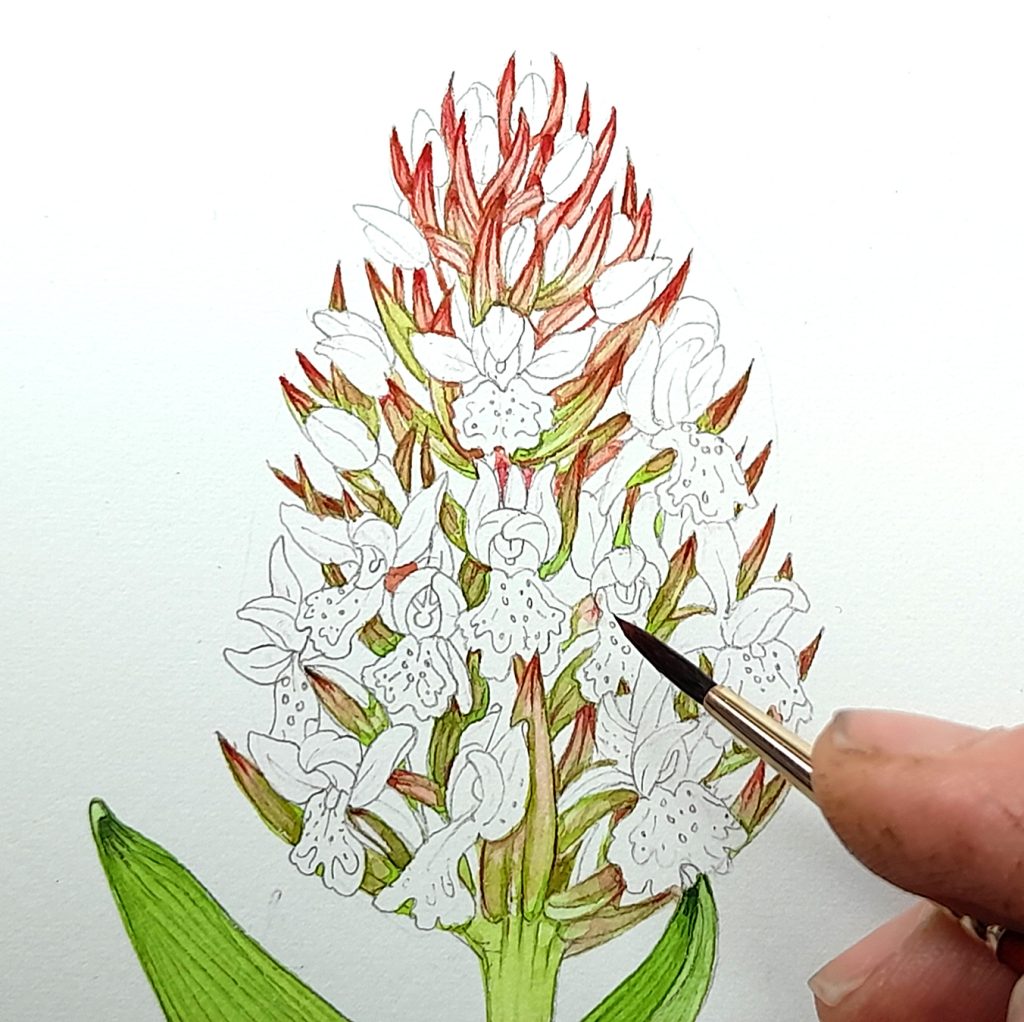
Once dry, I add more red to the bracts.
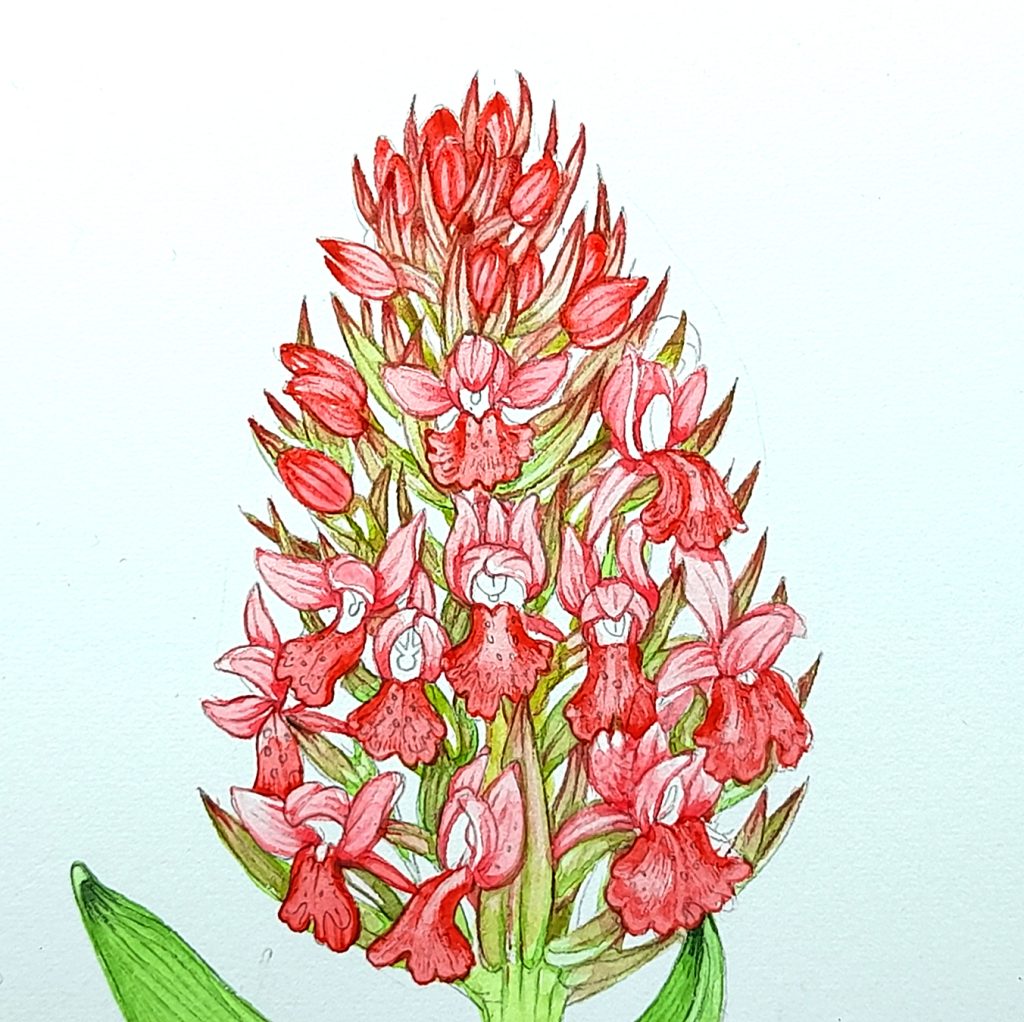
Flowers: The Labellum
The literature suggests that the labellum is a deeper red than the upper petals and sepals. This means I add a tiny bit more Cadmium red and a touch of Permanent carmine to the red mix. Although it doesn’t really succeed, I try to suggest the reflexing of the labellum edges as I paint. I’m worried that the flowers all look too orchid-typical, and not oblong enough.
Flowers in their entirety
The other sepals and petals are outlined with a pinker colour. This means adding more Opera pink, and water to the mix.
As always, colours are allowed to completely dry.
Now use tints of the red and of the pink to fill in the orchid flowers, leaving a white area at the centre of each flower. A dab of yellow green at the top of these central areas is enough to suggest the complexities of the pollinium, and a pale area is left below this.
Next come the distinctive markings on the labellum, easily added sing Permanent magenta straight form the pan.
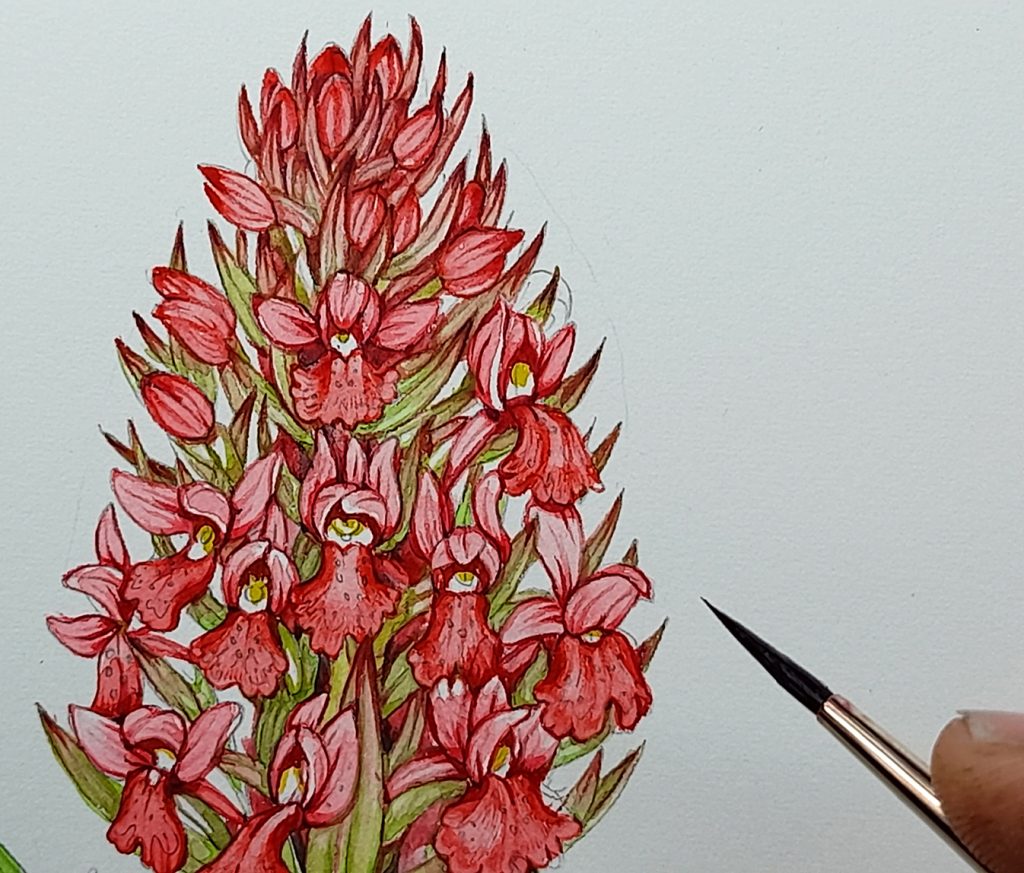
Now I need to knock the whole thing back, and make the inflorescence red and purple instead of green. Everything gets covered with a tint of Alizarin crimson and Opera rose. Once dry, there follows a very long period of adding darker shades of Alizarin crimson. Then I pick out shadows with a mix of Cobalt blue and the magenta. I also added a touch of the reds to the sheath area down by the pseudo-bulb. This helps unite the image.
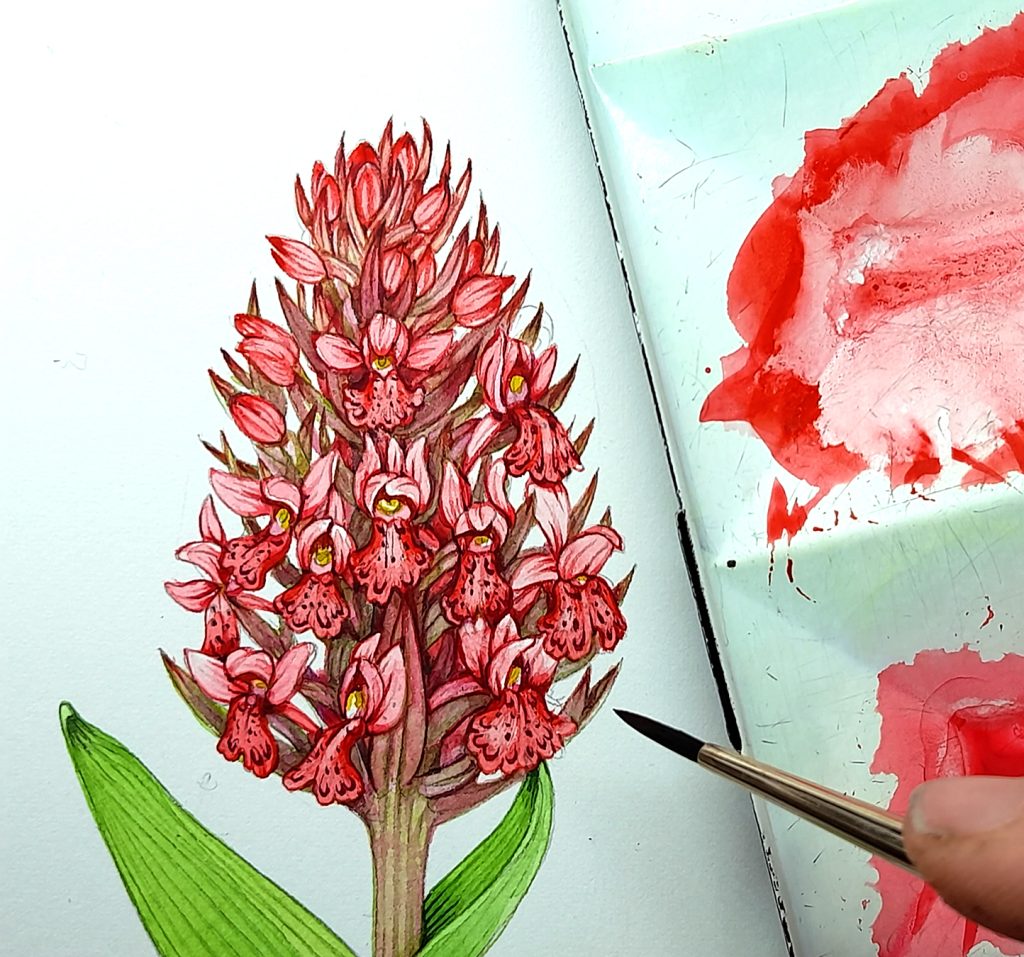
A few drop shadows made from Cobalt blue and Permanent magenta, and we’re done.
Conclusion
Knowing a little about the structure of orchids proved really helpful in this job. Right after finishing, I spilled most of a jar of water on the illustration. I was amazed and delighted to find that, after very loud swearing and judicious application of clean loo roll, no damage had been done.
![]()
Early Marsh Orchid Dactylorhiza incarnata ssp coccinea
I’m glad to have completed this illustration. I don’t think it’s my best orchid to date, but it passes muster. Fingers crossed that the client thinks so too!
To see a film of me illustrating this orchid in real time, please see below.
Below is a pdf of the finished orchid illustration. Feel free to print it off and trace (it’s for use as an art template only).
Early Marsh Orchid Dactylorhiza incarnata ssp coccinea
Superb way to spend my afternoon, Lizzie. You make the botany, and then the painting, so accessible.
Thanks
What a fabulous videa and lesson, thank you Lizzie
Aww, thanks Peter
I love your step by step thinking and demonstration. Thank you for sharing this. Very helpful.
Hi Leslie, so glad it was useful for you. x
Thank you for sharing your talent with us to learn and practice. Please keep sharing when you can.
Thank you Debbie, thats very kind of you and I will!
Lizzie Harper you are a wonderfully generous artist to share such detailed and interesting information with us all. Thank so much! It will hopefully , with your guidance , give me the confidence to try this project. Have a lovely day !
Thank you so much, Sofia! Im so glad you liked it!