

Step by Step Barn Swallow
Illustrating birds is always wonderful. When it’s for a friend, is a bird you love, and when you have specimens to work from, it’s even better.
Pencil roughs
As always, the first step in a natural history illustration is to source your reference material and draw up a pencil sketch. I do this directly onto watercolour paper. Using a Pentel P205 mechanical pencil, I am now working on Fluid 100 hot press paper.
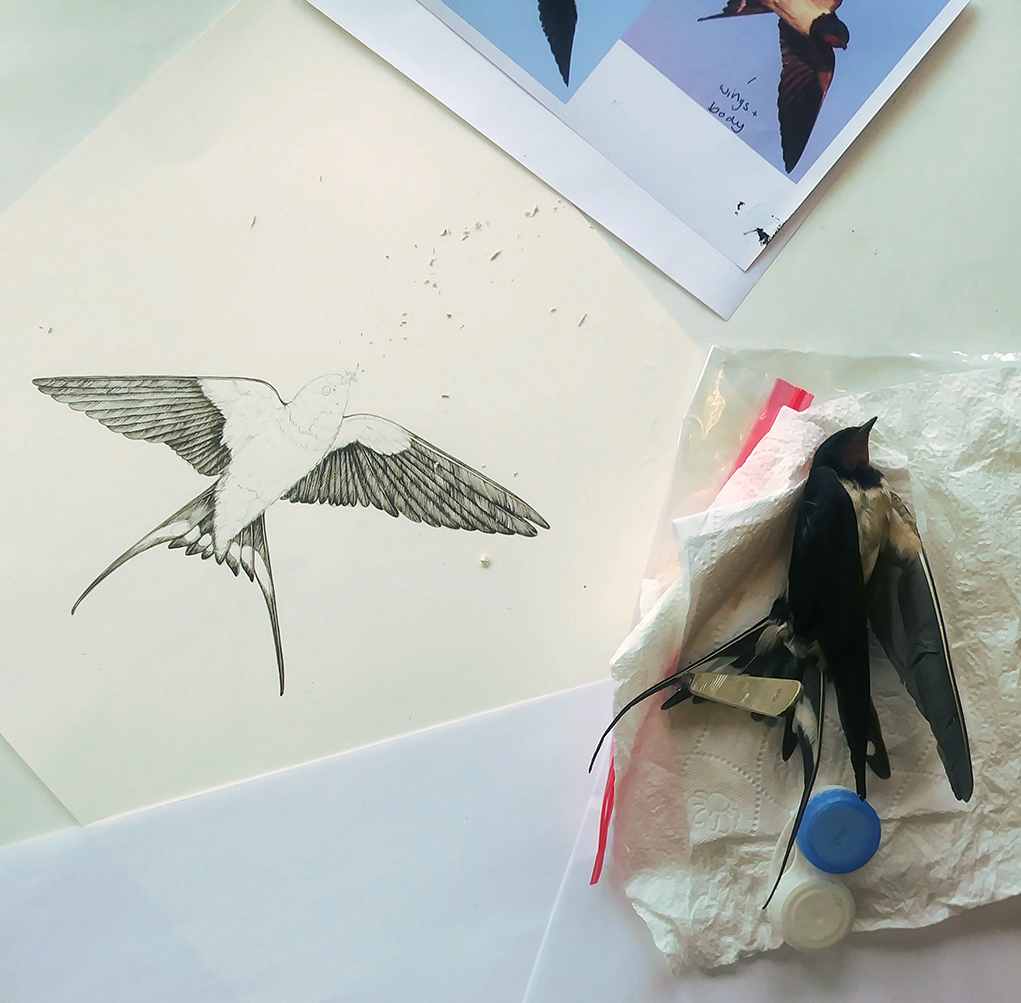
I am lucky enough to have a lot of specimens in the freezer. This sounds macarbre, but people know what I do for a living. If they see roadkill, or find a bird the cat brought in, they’ll often pass it on to me. I’ve recently taken a taxidermy course so I can store these speciemens as skins, rather than alongisde the ice cream in the freezer… For more on this, have a look at my youtube video “Birds, bugs, and bodeis in the Freezer”.
In fact, I drew the barn swallow twice. Once from below, and once from above.
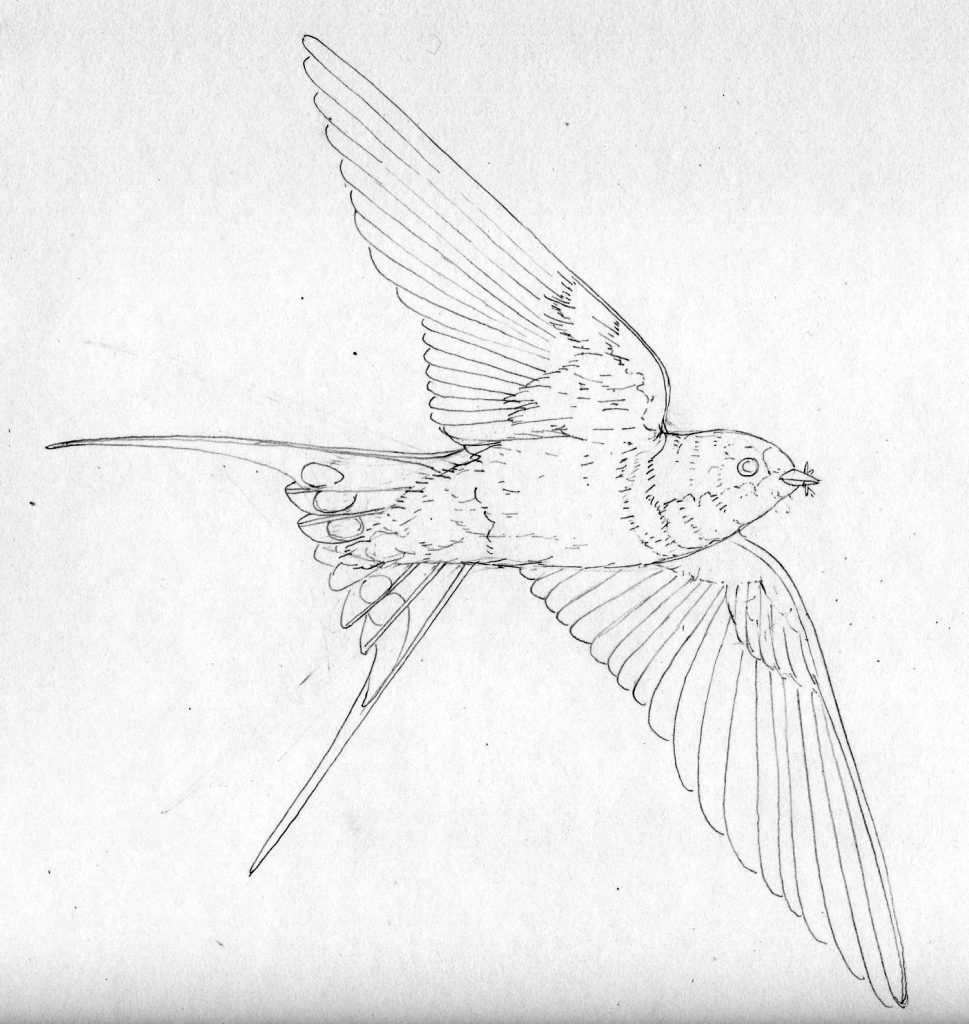
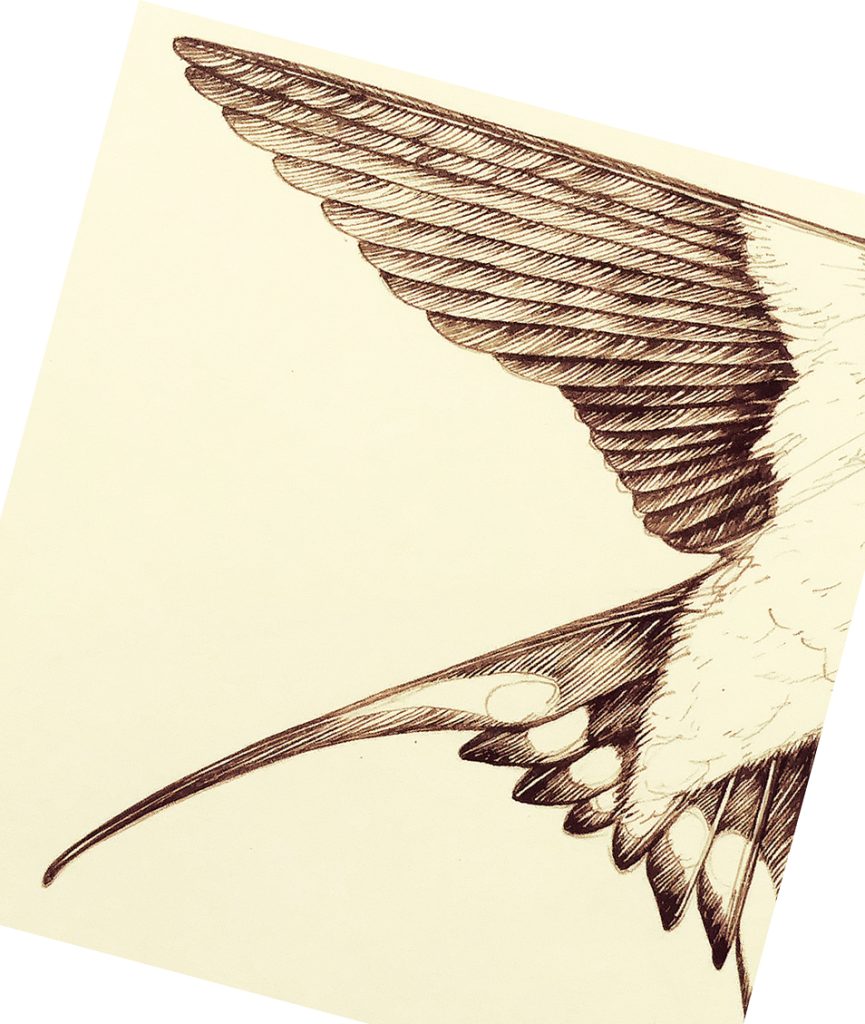
Swallow pencil rough, from below.
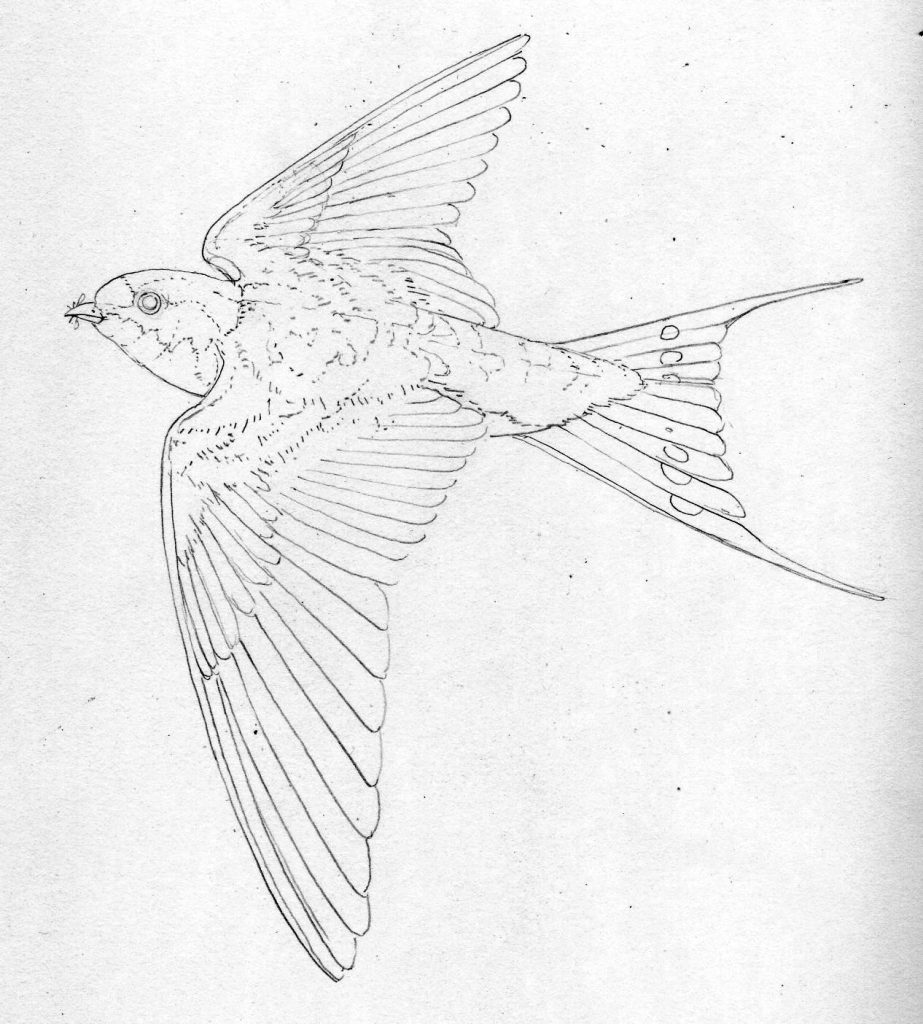
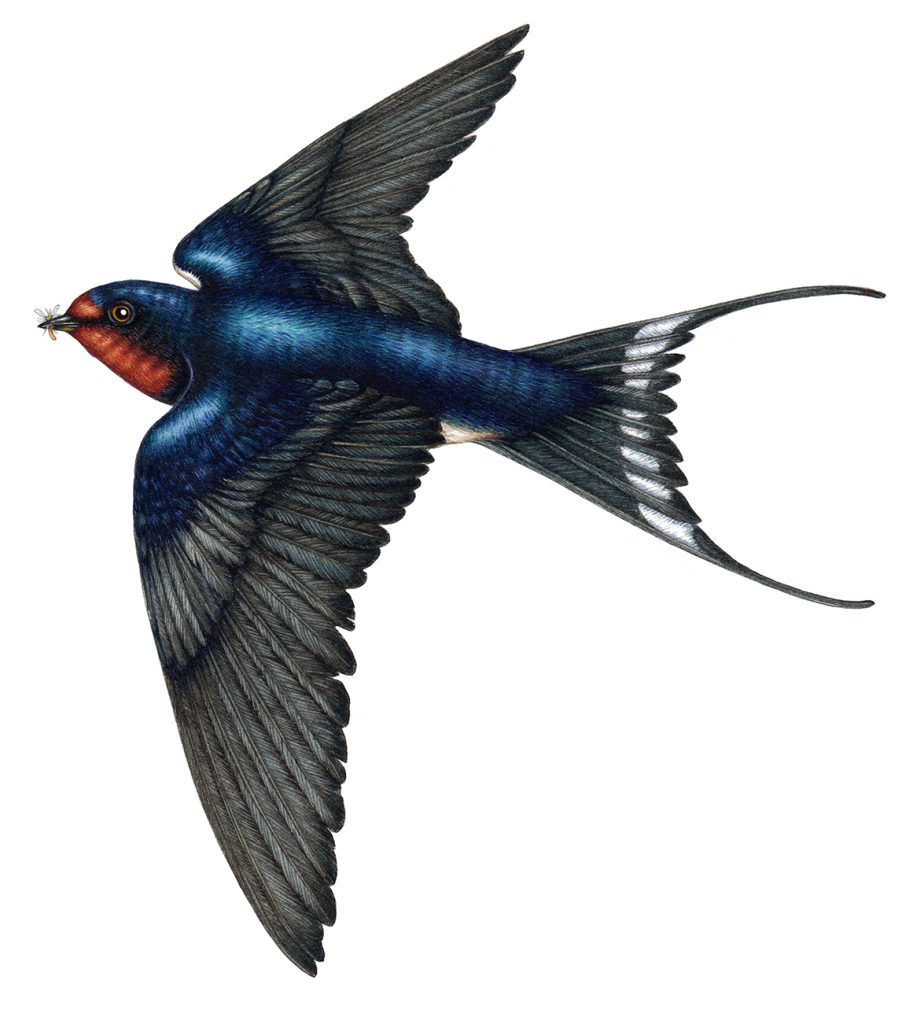
Swallow pencil rough, from above.
Step 1: Wing and tail feathers
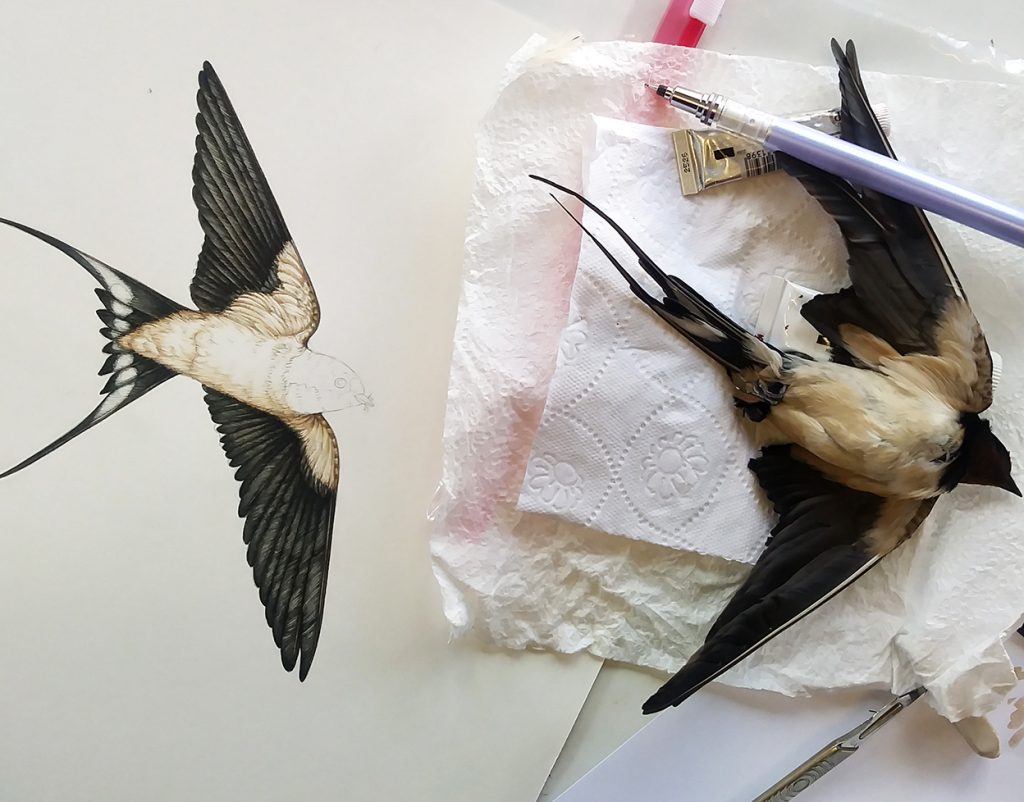
I start by looking closely at my specimen, I look at the directions of the detail on the feathers, and refer closely to the bird as I mix up a dark colour. This is a mix of Vandyke brown, Prussian blue, and lamp black. I tend to use Winsor and Newton pans. You aren’t supposed to, but when they run low I top them up from the tubes.
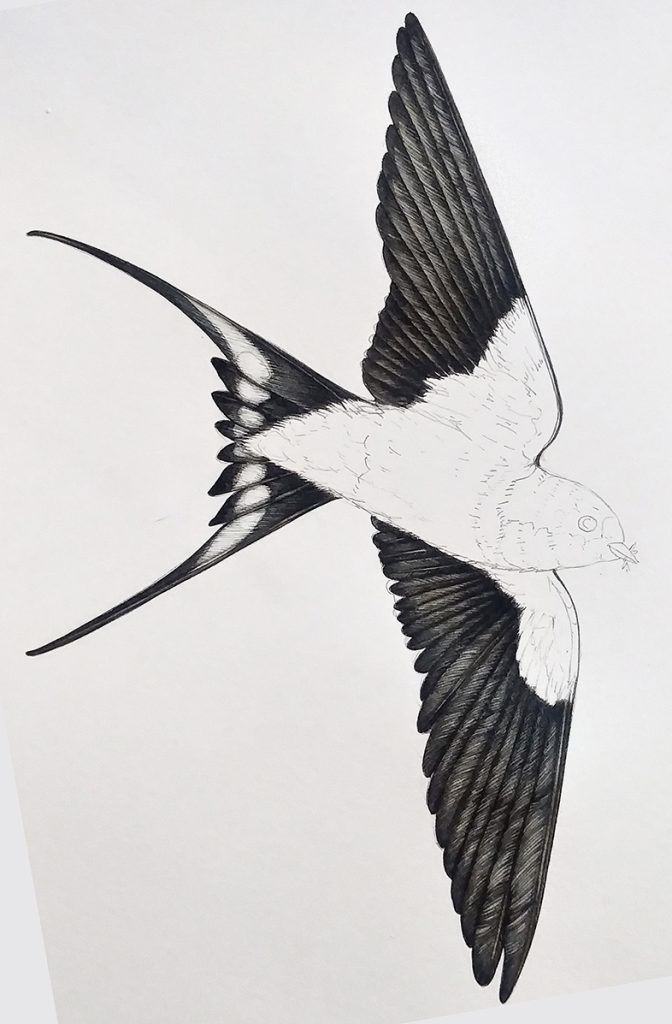
Barn swallow and painting in progress.
Here’s a detail (below) showing the parallel paint strokes. The white spots show the feathers’ white markings.
Working into the feathers is a matter of adding texture and body colour. I mix a dilute brown-black. This has more blue in than the first colour I mixed. I apply this over the feathers and let it dry. Once dry, I use a dark blue-black and work into the detail again. I focus on the feather edges.
The central veins of each flight feather is outlined with vandyke brown and a prussian blue.
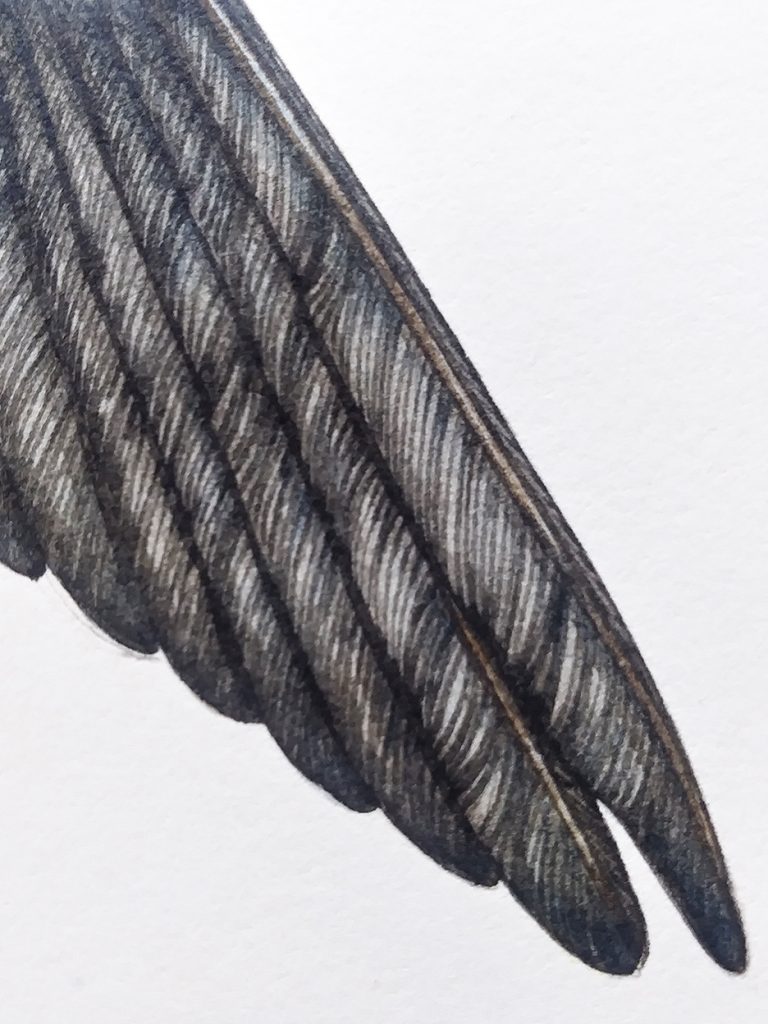
Detail of the Barn swallow feathers.
In the illustration below, you can see how these layers of dilute washes and detail have built up. The feathers have colour without losing all texture.
I’ve also added a little depth to the white markings. This involves a light touch, and a dilute mix of Cerelean blue and purple.
Step 2: Painting the body of the Barn swallow
The feathers on the swallow’s body are not white. They’re a buff cream colour. The trick with pale areas of feather is to only use the colour on the shades parts, and edges. A mix of yellow ochre, purple, and a touch of brown were used here. I applied the paint with tiny brush marks, quite dilute.
Body painted in.
Having the specimen to work from is invaluable. You can see the way the shadows fall on the feathers, and re-arrange the,m to perfectly match the drawing. I would have had trouble figuring out the white areas under the wings had I not had my swallow from the freezer on hand.
In this detail you can see how I used two or three shades of ochre to build up some depth. The graphite pencil marks are still visible.

Detail of the body feathers.
Comparing the specimen to the painting shows that I have made the body paler than it is in real life. This is a conscious decision. If you make pale areas too yellow or grey, you sometimes end up with a bird that lookd grubby. Keeping a light touch helps counter this effect.
Step 3: Painting the head of the barn swallow
The reds and blue-blacks on the head of the barn swallow are very distinctive. They’re also quite tricky to mix a good colour match for. Although I think of the throat patch as red, in fact it’s a brick-brown. I mix this with cadmium orange, vandyke brown, a touch of purple, and a little blue.
The colours also change dramatically depending on the light. You need to decide on one main colour and work around this.
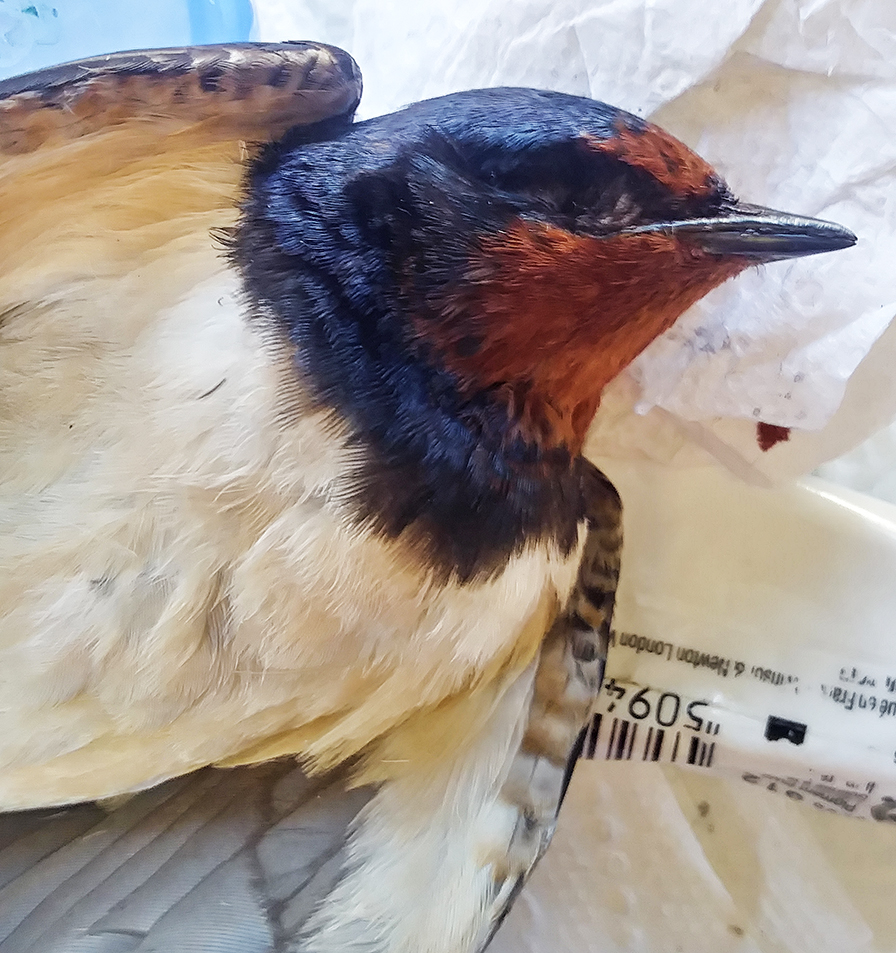
Head of the barn swallow specimen.
I build up the texture with lots of tiny brush strokes. Towards the centre of each area I leave a paler region. Once the underlying texture of the feathers is plotted in, I pop a top wash of a more dilute colour on these places. This helps provide a feeling of depth.
With the red of the throat, these highlights can be made rather yellow. With the dark blue crown, I chose a pale blue.
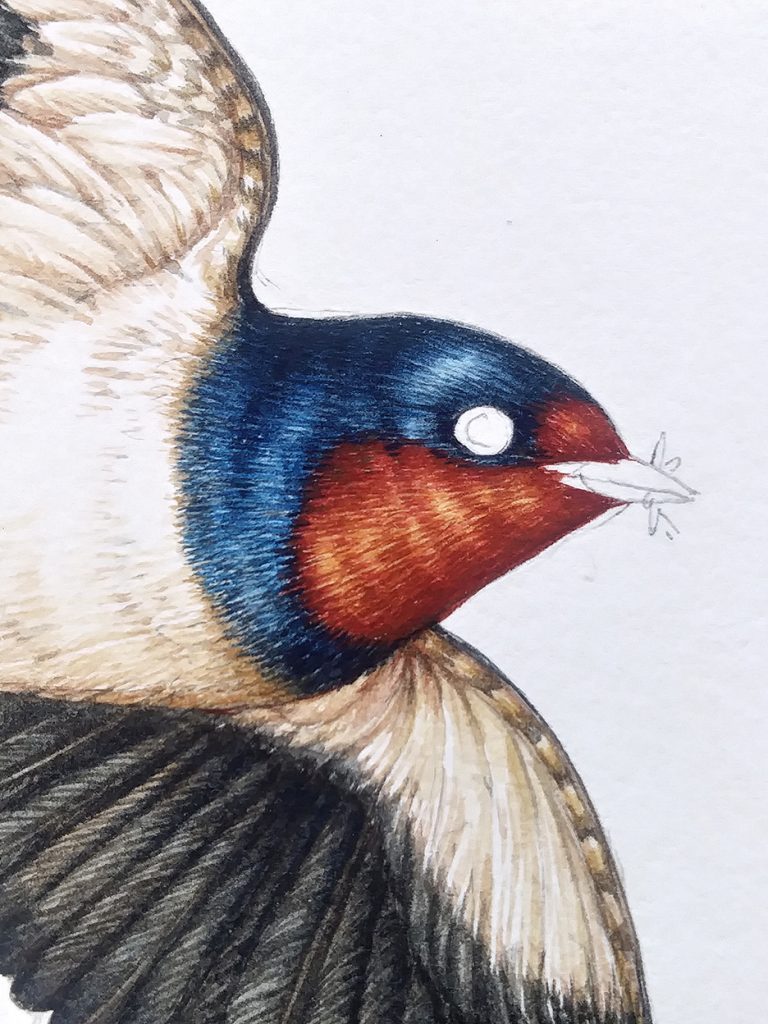
Head of the swallow detail.
Step 4: Eyes, beak, and details
I always paint the beak and eyes last. I know other illustrators who start with these details. They maintain (and they’re probably right) that is the eye is wrong the illustration is no good. I just feel a bit odd being stared at by my illustration as i try to bring it to life.
The drawback of working this way is that it puts a good deal of pressure on you to get the beak and eye correct!
The crucial part with the eye is to get the highlight right. I’ll sometimes revisit this with a touch to white goauche.
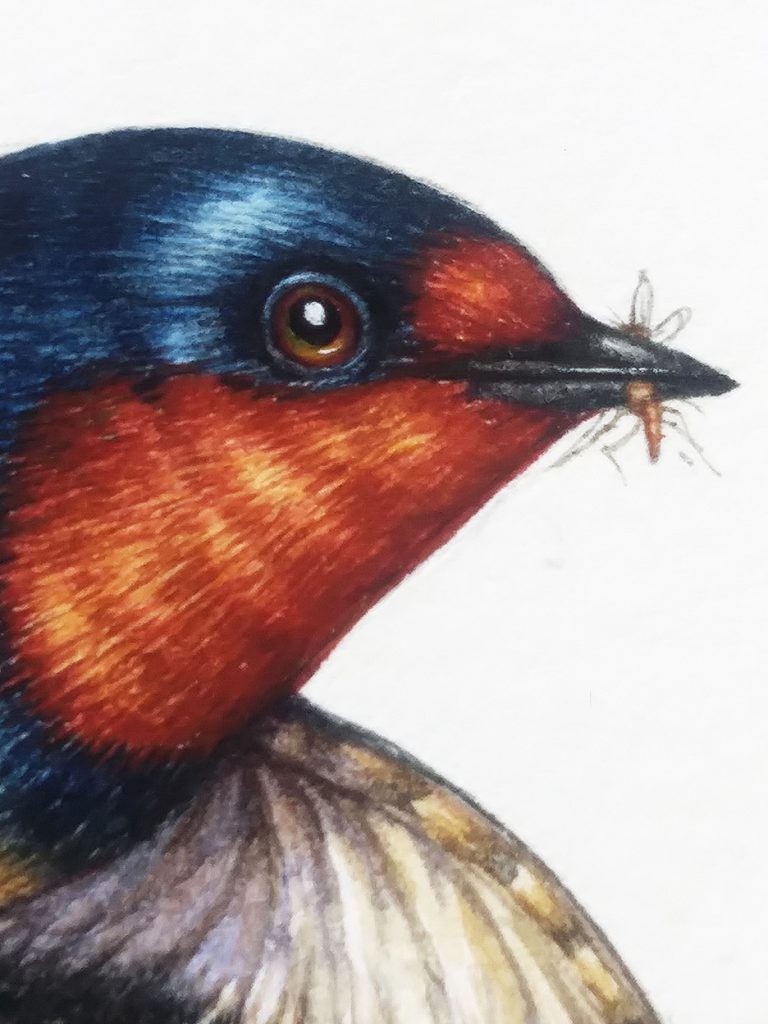
I chose to put a fly in the swallow’s beak, these amazing birds are voracious predators of tiny gnats and summer-flying insects.
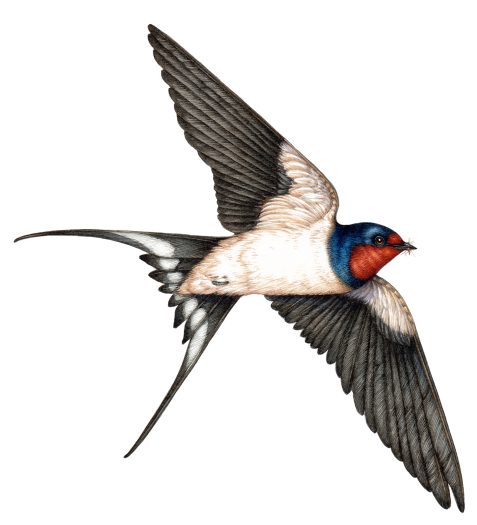
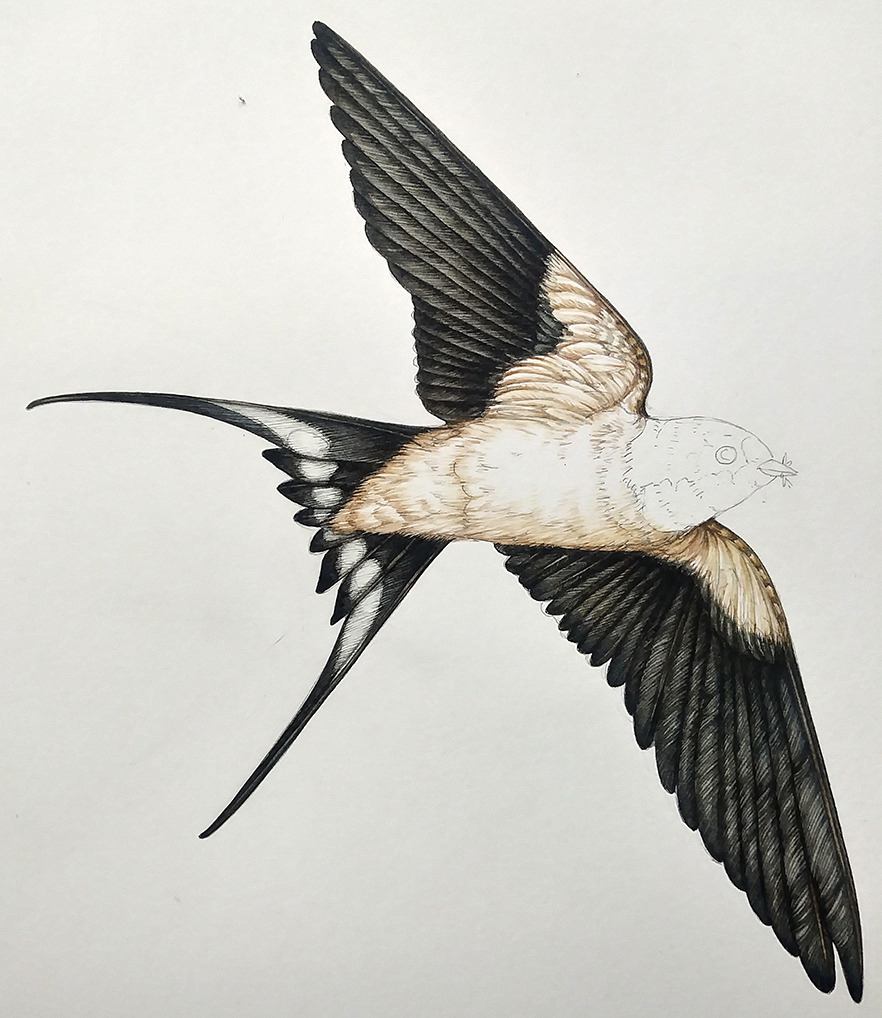
And here is the finished illustration.
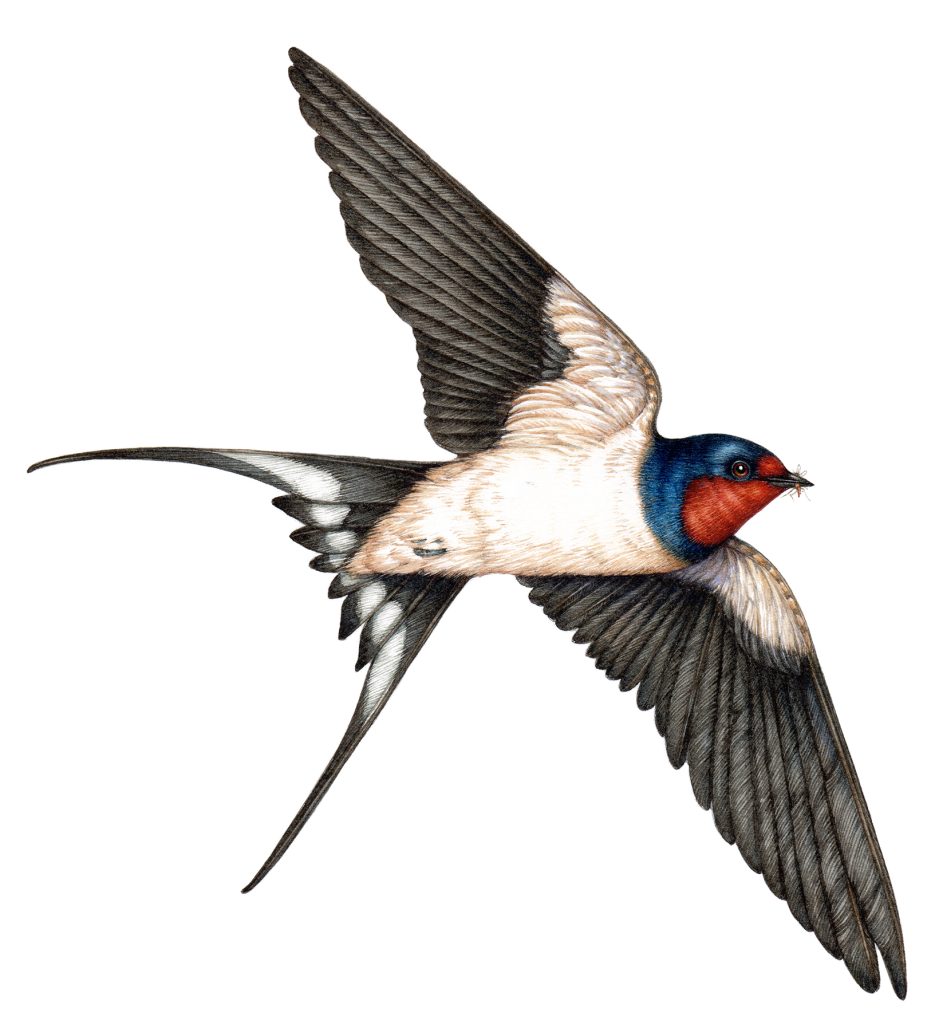
Finished illustration of the barn swallow.
Some final thoughts
I find it strange, when I illustrate an animal like a swallow. There’s this gorgeous, fragile specimen sitting on my desk. It seems absurd, as you examine the detail of the feathers and the intensity of its colours, to even try and replicate this beauty on paper.
I’m also acutely aware that this tiny creature, smaller than my hand, has probably migrated from rural Wales to south Africa and back. It seems so implausible, and so utterly extraordinary. What chance of fate caused the hapless bird to die here, in Hay on Wye? What other perils has it survived?
I feel incredibly privileged to work with these specimens. They make it much easier to illustrate an animal, but I also find them very moving.
Below is the finished illustration of the other pencil rough, seen from above rather than from below.
For other step by step animal illustration blogs, including birds, please check out my blogs.
I’d be interested to know how fast you have to work before your specimen “thaws out” and starts to decay? LOVING the new searchable, mobile-friendly blog, by the way. Thanks!
Hi Iris
The specimens thaw really fast as therye so tiny. But the decay doesnt set in for two or three days, so I can pop them bakc in the freezer overnight. However, each of the swallow illustrations only took a day, so it wasn’t a problem. Once they thaw a little its easier to open out the wings and move them around to fit the pose. Invaluable reference! So glad you like the new website and thanks so much for taking the time to comment! xxx
Love this. We have swallows that nest in our house in Mozambique.
You can’t beat a swallow. And there’s a chance the swallows in your house in Mozambique are the same extraordinary birds I see wheeling overhead here in Wales!
Thank you so much for the Blog. I love it. Keep up your beautiful work.
Hi Glenn
Thanks for the comment, and for taking the time both to read my blog and to comment. Also, the flattery is lovely to hear too! Thanks.
Yours
Lizzie
Thank you Lizzie
This was an excellent step by step guide to painting a barn swallow – which I throughly enjoyed following – thank you – I love your work and admire your patience’s with the detail and realism you achieve
Hi Tricia, I’m so glad you enjoyed following the blog. I’m also glad it was helpful. I like the idea that I’m patient…maybe with a paint brush, but my family will testify that I am far from being a model of patience! Thank you for taking the time to leave a comment, and for your generous words. X
Thank you for the detailed art lesson. I’m so happy you posted this. You are so very creative and talented. PS I’m fortunate to have swallows nest above my front door. There are no mosquitoes or flies when swallows are about.
Hi Dianne
Oh Im so glad you appreciate your swallows! I know some people try to dissuade them; I’d give anything to have them nest near me! I’m really glad the step by step was useful, and thanks for the kind comments!
For small birds, insects, reptiles, and even mammals such as mice or small bats you can dry them by putting them into a box covered completely in Borax, some use a mix of Borax and salt. Make sure the box is not sealed completely.. a cardboard box works well, or a plastic one with a non tight cover, you don’t want to seal the moisture in. Keep in a cool dry place. For best results the carcass should be as fresh as possible, freeze if necessary to hold but thaw before drying. You want to position them as you want them to be because they will be stiff in the end (for example wings out, you may need to fasten them to a stick or similar). It takes a long time but they will not rot after… generally between one and three months depending on the size. It also kills any parasites. For larger animals you need to remove internal organs and as much flesh as possible first and ensure you pack the body cavity with Borax as well. The Borax will not harm the feathers or fur and can be brushed away after.
Hiya, Oh my goodness. Thank you so much for this, what an incredibly helpful tip. So the borax does the work for you. This will be invaluable when it comesd to preserving little song birds and, as you mention, bats. I’ll no longer have to destroy them in my efforts to neatly skin them. Thankyou so much for taking the time to leave this comment, and for your detailed instructions, it’s really helpful. x
Kind question maam ? did you kill this swallow ?
Hi Nikhi
That’s a good question. No, I never kill the animals I illustrate. This swallow was found dead on the roadside, I suppose it must have been hit by a car. Lots of the other things I draw are caught by cats. Where I live, people know I like to have specimens in the freezer and will often give me things their pets may have killed, road-kill etc. The local vets will sometimes pass on garden birds that people brought in, but didn’t make it.
So no, I never would even think of killing an animal on purpose. I’m a committed vegetarian and would never kill an animal in order to paint it. However, if it’s already dead then I wont hesitate to take advantage of this, sad as it is.
Thanks for asking
Lizzie
Perfect! Your process for illustrating birds is truly fascinating! It’s amazing to see how you start with pencil roughs and source reference material to create such detailed artwork. I appreciate your dedication to capturing the essence of these beautiful creatures. The fact that you have a collection of specimens in your freezer, although unusual, shows your commitment to your craft. I’m curious to check out your YouTube video “Birds, bugs, and Bodies in the Freezer” to learn more about your taxidermy experience. Drawing the barn swallow from both below and above must have provided a unique perspective. Your talent and passion for natural history illustration shine through in your work. Keep up the incredible job!
Hi Hayden
That’s such a lovely comment. I’m so glad you liked the blog, and hope you enjoy the (somewhat macarbre) tour of my dead stuff! Thankyou
I love this illustrated drawing of the swallow and your technique.
Could you please tell me the size of the swallow?
Have you ever drawn a swift? Amazing birds that I have had the chance to watch this year!
Thank you.
Hi Jackie, if I remember rightly the original swallow watercolour was about 30 x 25cm. I have only done sketches of swifts, but they’re certainly on my list to illustrate between jobs. they are stunning, arent they?
Thanks for your wonderful artistic and nature-loving insight. I, too, paint birds. I work on 300# hot press watercolor paper. The difference is that I use acrylic paints that are watered down to be the consistency of a wash and, like you, build up. I find that the acrylic gives me a sharper line and more vibrancy. Also easier to build up texture. Have you tried this? Not to suggest that what you paint isn’t perfectly wonderful. Just enjoy swapping technique with other artists. And thanks for not making those of us that have birds in our freezer alongside the ice-cream seem odd! Perfectly normal in my household to have to sift through the specimens to get to the pop sickles. Your work is wonderful.
Hi Linda
I love this, thankyou. I have used acrylics, but never watered down. What a good idea, I may give it a go one day, I can see how they’d give excellent crisp edges and glowing colour. And so good to know that there are lots of unusual freezers out there!
so…if you really love birds,why you never tell you neighbors and friends not let their pet kill birds. If they take good care of their pets,pets would never have chance to kill birds.
Hi Sofie
Ah. This is so true. But unfortunately, if a cat kills or doesn;t kill has nothing to do with how well fed it is. Our own pet cat is fed every day, possibly is slightly too fat! Yet he often kills birds, mice, and other little aniumals. I hate it, but it is his instincts, not because he needs the food. A better question would probably be, “if you care about birds why do you have a cat, and why dont you advise other people not to have cats?” And the answer is very selfish. I love my cat. But the way the birds get killed breaks my heart. And he manages to catch them even with 3 bells on his collar. It’s really sad.
Thanks for your comment, like I say, you are right.
Yours
Lizzie
How do you select and prioritize reference materials for your pencil sketches? What criteria do you use to determine the most useful specimens for your illustrations?
Hi Ilmu
Thanks for this, and your other comments. Im afraid I had to delete the other cones cause they were full of links. Getting ref is really difficult. Easy if the plant is growing ther, harder if you have to trawl through online sites. I also have an extensive library of books that I choose from.
the most useful specimen is the one that “feels right”, and looks most like your average plant, so no etra large leaves or odd colours. Its very much a matter of taste.
thanks for the question, really interesting one.
yours
Lizzie